How to create a drop-down list?
Categories:
How to Create a Drop-Down List (Spinner) in Android

Learn to implement a functional and user-friendly drop-down list, also known as a Spinner, in your Android applications using Kotlin or Java.
Drop-down lists, commonly referred to as Spinners in Android development, are essential UI components for allowing users to select one item from a predefined set. They provide a clean and efficient way to present multiple options without cluttering the screen. This article will guide you through the process of creating and customizing Spinners in your Android applications, covering both basic implementation and more advanced use cases.
Understanding the Android Spinner Component
The Spinner widget in Android is a view that displays one item at a time, but when touched, it expands to show all available items, allowing the user to select one. It's typically used when you have a limited number of choices that don't require a full-screen selection interface. To populate a Spinner, you need an Adapter which acts as a bridge between the data source (e.g., an array of strings) and the Spinner's UI.
flowchart TD
    A[Start] --> B{Data Source (e.g., Array, List)};
    B --> C[Adapter (e.g., ArrayAdapter)];
    C --> D[Spinner Widget];
    D -- User Selects Item --> E[OnItemSelectedListener];
    E --> F[Handle Selection Logic];
    F --> G[End];
Basic flow for populating and handling a Spinner in Android.
Basic Spinner Implementation
Implementing a basic Spinner involves defining the Spinner in your layout XML, preparing your data source, and then using an ArrayAdapter to bind the data to the Spinner. Finally, you'll attach an OnItemSelectedListener to react to user selections.
1. Add Spinner to Layout XML
First, include the Spinner widget in your activity's layout file (e.g., activity_main.xml). You can also define an ID for it to reference it in your code.
2. Define Data Source
Create an array of strings or a List<String> that will serve as the options for your drop-down list. This can be hardcoded or fetched dynamically.
3. Create an ArrayAdapter
Instantiate an ArrayAdapter, passing the context, a layout for the spinner items (e.g., android.R.layout.simple_spinner_item), and your data source. The simple_spinner_item is a standard Android layout for single-line text views.
4. Set Drop-down View Resource (Optional but Recommended)
For a better visual experience, set a different layout for the drop-down view using setDropDownViewResource(). android.R.layout.simple_spinner_dropdown_item is a good default.
5. Attach Adapter to Spinner
Assign the created ArrayAdapter to your Spinner instance using spinner.setAdapter(adapter).
6. Implement OnItemSelectedListener
To respond to user selections, implement the AdapterView.OnItemSelectedListener interface. Override onItemSelected() to get the selected item and onNothingSelected() for when no item is selected (e.g., when the adapter data changes).
Kotlin
// activity_main.xml
<Spinner
    android:id="@+id/spinner_options"
    android:layout_width="match_parent"
    android:layout_height="wrap_content"
    android:padding="16dp" />

// MainActivity.kt
import android.os.Bundle
import android.view.View
import android.widget.AdapterView
import android.widget.ArrayAdapter
import android.widget.Spinner
import android.widget.Toast
import androidx.appcompat.app.AppCompatActivity

class MainActivity : AppCompatActivity() {

    override fun onCreate(savedInstanceState: Bundle?) {
        super.onCreate(savedInstanceState)
        setContentView(R.layout.activity_main)

        val spinner: Spinner = findViewById(R.id.spinner_options)
        val options = arrayOf("Option 1", "Option 2", "Option 3", "Option 4")

        val adapter = ArrayAdapter(this, android.R.layout.simple_spinner_item, options)
        adapter.setDropDownViewResource(android.R.layout.simple_spinner_dropdown_item)
        spinner.adapter = adapter

        spinner.onItemSelectedListener = object : AdapterView.OnItemSelectedListener {
            override fun onItemSelected(parent: AdapterView<*>, view: View?, position: Int, id: Long) {
                val selectedItem = parent.getItemAtPosition(position).toString()
                Toast.makeText(this@MainActivity, "Selected: $selectedItem", Toast.LENGTH_SHORT).show()
            }

            override fun onNothingSelected(parent: AdapterView<*>) {
                // Another interface callback
            }
        }
    }
}
Java
// activity_main.xml
<Spinner
    android:id="@+id/spinner_options"
    android:layout_width="match_parent"
    android:layout_height="wrap_content"
    android:padding="16dp" />

// MainActivity.java
import android.os.Bundle;
import android.view.View;
import android.widget.AdapterView;
import android.widget.ArrayAdapter;
import android.widget.Spinner;
import android.widget.Toast;
import androidx.appcompat.app.AppCompatActivity;

public class MainActivity extends AppCompatActivity {

    @Override
    protected void onCreate(Bundle savedInstanceState) {
        super.onCreate(savedInstanceState);
        setContentView(R.layout.activity_main);

        Spinner spinner = findViewById(R.id.spinner_options);
        String[] options = {"Option 1", "Option 2", "Option 3", "Option 4"};

        ArrayAdapter<String> adapter = new ArrayAdapter<>(this, android.R.layout.simple_spinner_item, options);
        adapter.setDropDownViewResource(android.R.layout.simple_spinner_dropdown_item);
        spinner.setAdapter(adapter);

        spinner.setOnItemSelectedListener(new AdapterView.OnItemSelectedListener() {
            @Override
            public void onItemSelected(AdapterView<?> parent, View view, int position, long id) {
                String selectedItem = parent.getItemAtPosition(position).toString();
                Toast.makeText(MainActivity.this, "Selected: " + selectedItem, Toast.LENGTH_SHORT).show();
            }

            @Override
            public void onNothingSelected(AdapterView<?> parent) {
                // Another interface callback
            }
        });
    }
}
simple_spinner_item and simple_spinner_dropdown_item instead of using the default Android ones. This allows you to control text size, color, padding, and more.Handling Complex Data Types with Custom Adapters
While ArrayAdapter<String> is suitable for simple text lists, you'll often need to display more complex objects (e.g., a list of User objects, each with an ID and a name). In such cases, you'll create a custom Adapter that extends ArrayAdapter or BaseAdapter and overrides the getView() and getDropDownView() methods to properly display your custom object's data.
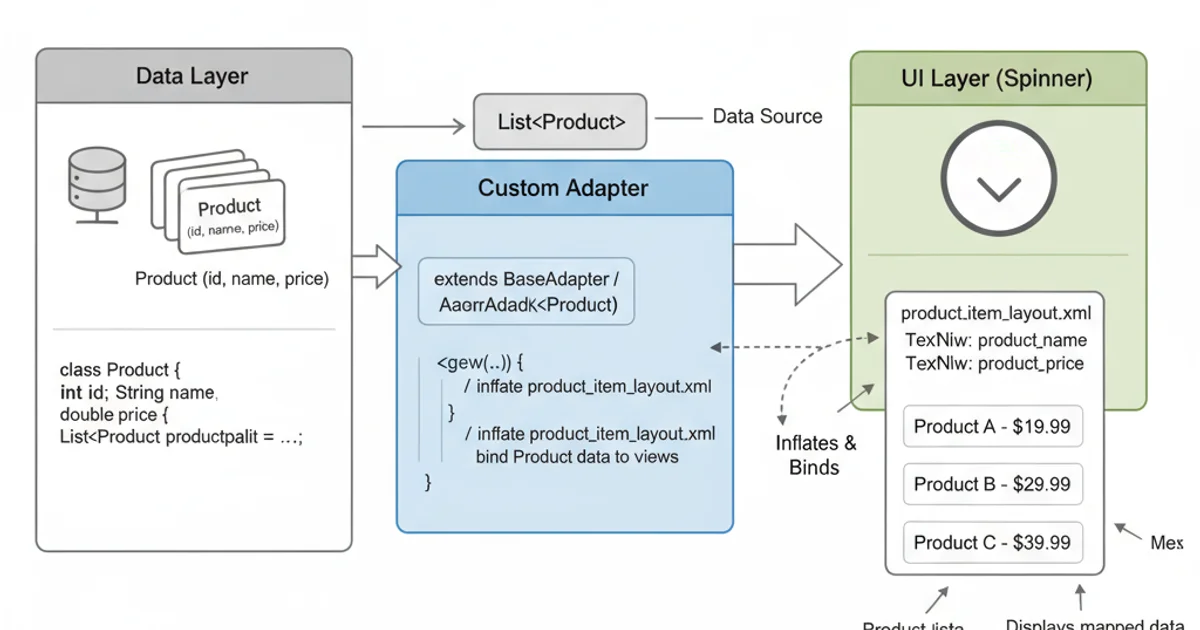
Mapping complex data objects to Spinner items using a custom adapter.
getView() (for the selected item display) and getDropDownView() (for the items in the drop-down list) to ensure consistent and correct rendering.