Change COM port via registry, command line or software?
Categories:
Managing COM Port Assignments: Registry, Command Line, and Software Solutions

Explore various methods for changing COM port assignments in Windows, from direct registry manipulation to command-line utilities and specialized software, understanding their implications and best use cases.
Managing COM port assignments is a common task for developers and system administrators working with serial communication devices, especially when dealing with virtual serial ports or devices that require specific port numbers. While Windows automatically assigns COM port numbers, there are scenarios where manual intervention is necessary. This article delves into different approaches to change COM port assignments, including direct registry edits, command-line tools, and third-party software, providing a comprehensive guide to help you choose the most suitable method for your needs.
Understanding COM Port Assignment in Windows
When a serial device (physical or virtual) is connected to a Windows system, the operating system assigns it a COM port number. This assignment is stored in the Windows Registry. Each device instance gets a unique identifier, and its associated COM port number is recorded under specific registry keys. Understanding this underlying mechanism is crucial for effective manual management.
flowchart TD
    A[Device Connected/Installed] --> B{Windows Detects Device}
    B --> C{Checks Registry for Existing Assignment}
    C -->|Found| D[Uses Existing COM Port]
    C -->|Not Found| E[Assigns New Available COM Port]
    E --> F[Updates Registry with New Assignment]
    F --> G[Device Ready for Use]
    D --> G
Windows COM Port Assignment Workflow
Method 1: Changing COM Port via Device Manager (GUI)
The most common and user-friendly way to change a COM port assignment is through the Windows Device Manager. This method is generally safe and recommended for most users, as it handles the underlying registry changes automatically and ensures that the new port number is not already in use by another active device.
1. Open Device Manager
Press Win + X and select 'Device Manager' from the power user menu, or search for 'Device Manager' in the Start menu.
2. Locate the Serial Port
Expand the 'Ports (COM & LPT)' section. Find the serial port you wish to modify. It might be listed as 'USB Serial Port', 'Prolific USB-to-Serial Comm Port', or similar.
3. Access Port Settings
Right-click on the desired serial port and select 'Properties'. Go to the 'Port Settings' tab and then click the 'Advanced...' button.
4. Change COM Port Number
In the 'Advanced Settings' dialog, locate the 'COM Port Number' dropdown. Select an available COM port number from the list. It's advisable to choose a higher number (e.g., COM10 or above) to avoid conflicts with dynamically assigned ports.
5. Confirm Changes
Click 'OK' on all open dialogs to apply the changes. You may need to restart the application using the serial port or even the system for the changes to take full effect.
(in use) are currently assigned to other devices, even if those devices are not presently connected. Choosing an (in use) port can lead to conflicts if the original device is later connected.Method 2: Command Line and Registry Manipulation
For automated scripts or scenarios where a GUI is not available, direct command-line tools or registry manipulation can be used. This method requires a deeper understanding of the Windows Registry and should be approached with caution, as incorrect modifications can lead to system instability.
The primary registry key for COM port configuration is HKEY_LOCAL_MACHINE\SYSTEM\CurrentControlSet\Control\COM Name Arbiter. This key contains a ComDB value, which is a bitmask indicating which COM ports are currently in use. Additionally, individual device settings are often found under HKEY_LOCAL_MACHINE\SYSTEM\CurrentControlSet\Enum\<Device_Type>\<Device_Instance_ID>\Device Parameters.
:: List all COM ports and their friendly names
reg query HKLM\HARDWARE\DEVICEMAP\SERIALCOMM

:: Example of changing a port (requires finding the correct device instance ID)
:: This is highly complex and not recommended for direct manual editing.
:: Instead, use devcon.exe or Device Manager.

:: Using devcon.exe (Windows Driver Kit tool) to change port
:: First, find the hardware ID of your device (e.g., from Device Manager -> Details tab -> Hardware Ids)
:: devcon.exe hwids =ports
:: devcon.exe setport <Hardware_ID> =COM<New_Port_Number>
Command-line examples for querying COM ports and conceptual approach for changing (requires devcon.exe)
ComDB registry value or other device-specific registry entries without proper knowledge can corrupt your system's device configuration. Always back up your registry before making manual changes, and consider using devcon.exe or Device Manager instead.Method 3: Using Third-Party Software
Several third-party utilities are designed to simplify COM port management, especially for virtual serial ports or complex setups. These tools often provide a more robust interface than Device Manager and can offer features like port remapping, virtual port creation, and conflict resolution.
Examples of such software include tools provided by virtual serial port drivers (e.g., for Bluetooth serial ports, USB-to-serial adapters) or dedicated COM port managers. These applications typically abstract away the registry complexities, offering a user-friendly way to assign and manage ports.
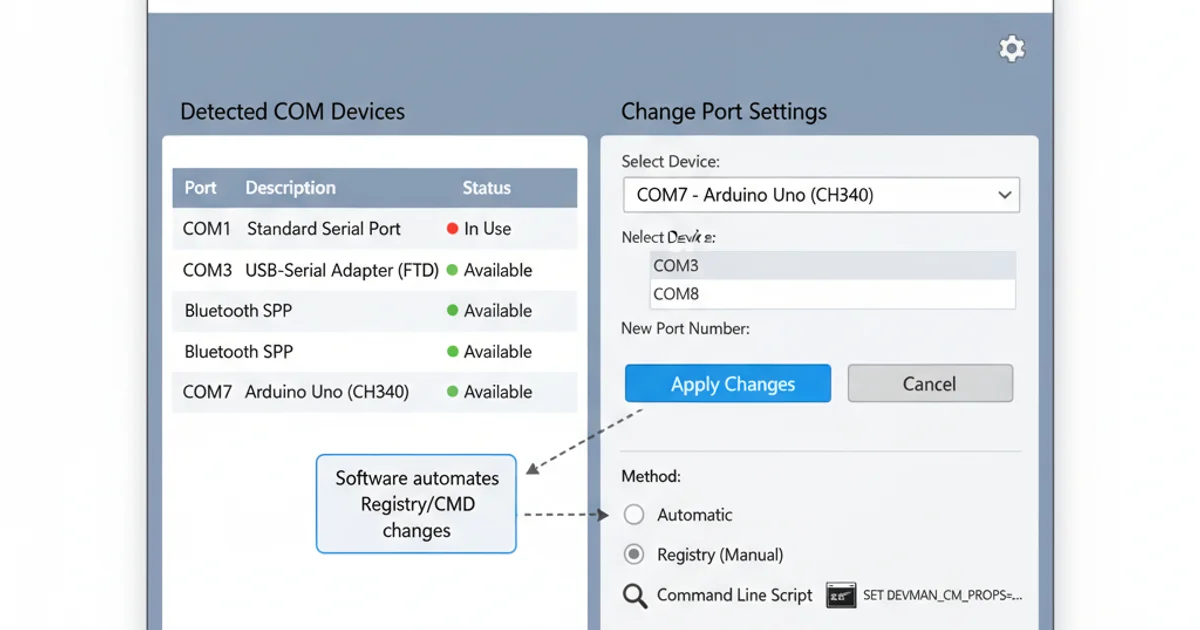
Example interface of a third-party COM port management utility.
Choosing the Right Method
The best method depends on your specific needs:
- Device Manager (GUI): Recommended for most users and single-device changes. It's safe, intuitive, and handles conflicts well.
- Command Line (
devcon.exe): Suitable for scripting, automation, or headless server environments where a GUI is not available. Requires the Windows Driver Kit. - Registry Editing: Generally discouraged for direct manual changes due to complexity and risk. It's the underlying mechanism, but tools like Device Manager or
devcon.exeprovide a safer abstraction. - Third-Party Software: Ideal for advanced scenarios, virtual serial port management, or when you need more features than Device Manager offers. Provides a user-friendly interface for complex tasks.