How do I make a blur effect like a profile site on twitter?
Categories:
Creating a Dynamic Blur Effect for Profile Headers in iOS
Learn how to implement a Twitter-like dynamic blur effect on a profile header image as a UIScrollView scrolls, enhancing UI aesthetics and user experience in your iOS applications.
Many modern social media applications, like Twitter, employ a visually appealing blur effect on their profile headers. As the user scrolls down, the header image often blurs or unblurs dynamically, creating a smooth and engaging user experience. This article will guide you through implementing such a dynamic blur effect in an iOS application using UIScrollView, UIVisualEffectView, and some basic animation techniques.
Understanding the Core Components
To achieve this effect, we'll primarily rely on three key iOS components:
UIScrollView: This is the foundation for any scrollable content. We'll use itscontentOffsetproperty to track the user's scroll position.UIImageView: This will display our header image, which will be blurred.UIVisualEffectViewwithUIBlurEffect: This powerful combination allows us to apply real-time blur effects. By adjusting thealphaoreffectproperty of theUIVisualEffectView, we can control the intensity of the blur.
The general idea is to observe the UIScrollView's scroll events and, based on the scroll position, dynamically update the blur intensity of the UIVisualEffectView that overlays our header image.
flowchart TD
    A[User Scrolls UIScrollView] --> B{Calculate Scroll Offset}
    B --> C{Determine Blur Intensity}
    C --> D[Update UIVisualEffectView's Alpha/Effect]
    D --> E[Apply Blur to Header Image]
Workflow for dynamic blur effect based on scroll position.
Setting Up Your UI
First, let's set up the basic UI elements in your UIViewController. You'll need a UIScrollView, a UIImageView for the header, and a UIVisualEffectView to apply the blur. For simplicity, we'll assume these are set up programmatically or via Interface Builder and connected as IBOutlets.
import UIKit

class ProfileViewController: UIViewController, UIScrollViewDelegate {

    @IBOutlet weak var scrollView: UIScrollView!
    @IBOutlet weak var headerImageView: UIImageView!
    @IBOutlet weak var blurEffectView: UIVisualEffectView!

    let headerHeight: CGFloat = 200.0 // Initial height of the header
    let blurThreshold: CGFloat = 100.0 // Scroll distance before full blur

    override func viewDidLoad() {
        super.viewDidLoad()
        scrollView.delegate = self
        setupHeaderView()
    }

    func setupHeaderView() {
        // Ensure the blur effect view is initially clear or slightly blurred
        blurEffectView.effect = nil // Start with no blur
        blurEffectView.alpha = 0.0 // Start fully transparent

        // Set up initial content size for scroll view
        // This example assumes content below the header
        scrollView.contentSize = CGSize(width: view.bounds.width, height: view.bounds.height + headerHeight)
    }

    // MARK: - UIScrollViewDelegate

    func scrollViewDidScroll(_ scrollView: UIScrollView) {
        let offsetY = scrollView.contentOffset.y

        // Calculate blur intensity based on scroll offset
        let blurProgress = min(1.0, max(0.0, offsetY / blurThreshold))

        // Apply blur effect
        if blurProgress > 0 {
            let blurEffect = UIBlurEffect(style: .dark)
            blurEffectView.effect = blurEffect
            blurEffectView.alpha = blurProgress
        } else {
            blurEffectView.effect = nil
            blurEffectView.alpha = 0.0
        }

        // Optional: Parallax effect for the header image
        if offsetY < 0 {
            headerImageView.transform = CGAffineTransform(translationX: 0, y: offsetY / 2)
        } else {
            headerImageView.transform = .identity
        }
    }
}
Basic UIViewController setup with UIScrollViewDelegate for dynamic blur.
UIVisualEffectView's alpha property to fade in/out the blur effect, rather than constantly changing blurEffectView.effect which can be more expensive. The example above uses alpha for this reason.Refining the Blur Effect
The UIBlurEffect has different styles (.light, .dark, .extraLight, .regular, .prominent). Choose the one that best fits your app's aesthetic. You can also experiment with the blurThreshold constant to control how quickly the blur intensifies as the user scrolls. A smaller threshold means a faster blur, while a larger one provides a more gradual transition.
For a more advanced effect, you might want to adjust the header image's size or position as well, creating a parallax effect, as shown in the optional part of the scrollViewDidScroll method. This adds another layer of polish to the user experience.
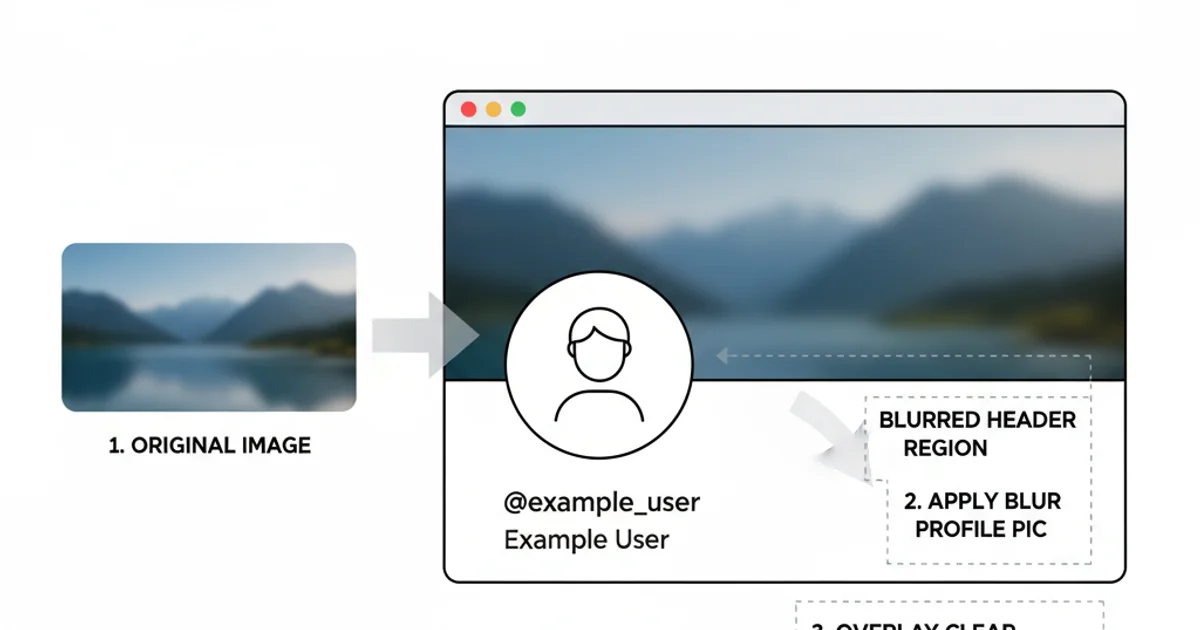
Example of a profile header with a dynamic blur effect.
Considerations and Best Practices
When implementing dynamic blur effects, keep the following in mind:
- Performance: While
UIVisualEffectViewis optimized, excessive manipulation can still impact performance. Test on various devices. - Accessibility: Ensure that the blurred background doesn't make foreground content (like text or profile pictures) unreadable. Maintain sufficient contrast.
- Initial State: Decide whether your header should start blurred or clear. The provided code starts clear and blurs on scroll.
- Content Below Header: Make sure your
UIScrollView'scontentSizeis correctly set to allow for scrolling past the header, revealing the blur effect.
1. Set up UI Elements
Add a UIScrollView, UIImageView (for the header), and UIVisualEffectView (for the blur) to your UIViewController's view hierarchy. Connect them as IBOutlets.
2. Implement UIScrollViewDelegate
Make your UIViewController conform to UIScrollViewDelegate and set its delegate property to self.
3. Handle Scroll Events
Implement scrollViewDidScroll(_:) to calculate the scroll offset and determine the blur intensity. Update the alpha and effect properties of your UIVisualEffectView accordingly.
4. Test and Refine
Run your application, scroll the content, and adjust constants like blurThreshold and UIBlurEffect style to achieve the desired visual effect and performance.