Canvas roulette wheel - using background images as each slice
Categories:
Crafting a Canvas Roulette Wheel with Background Image Slices

Learn how to create an interactive roulette wheel on an HTML canvas, where each slice is represented by a unique background image, offering a visually rich and dynamic user experience.
Creating a roulette wheel on an HTML canvas is a common and engaging task for web developers. While many examples focus on solid colors or simple text for slices, this article delves into a more advanced technique: using individual background images for each slice. This approach allows for highly customized and visually appealing wheels, perfect for games, prize draws, or interactive selections. We'll cover the core concepts of canvas drawing, image loading, and dynamic slice rendering.
Understanding the Core Canvas Concepts
Before diving into image-based slices, it's crucial to grasp the fundamentals of drawing on an HTML canvas. A roulette wheel is essentially a collection of arcs (slices) radiating from a central point. Each arc needs to be drawn, and then its corresponding image needs to be positioned and clipped within that arc. This involves calculating angles, radii, and understanding how to manipulate the canvas context for drawing and image rendering.
flowchart TD
    A[Initialize Canvas] --> B{Define Wheel Parameters}
    B --> C[Load All Slice Images]
    C --> D{Loop Through Each Slice}
    D --> E[Calculate Slice Angles]
    E --> F[Draw Slice Path]
    F --> G[Clip Canvas to Slice Path]
    G --> H[Draw Image within Clipped Area]
    H --> I[Restore Canvas State]
    D -- End Loop --> J[Render Wheel]
Process flow for rendering a canvas roulette wheel with image slices.
Loading and Preparing Images for Slices
The most critical aspect of this technique is efficiently loading and managing the background images. Since images are asynchronous resources, you cannot simply draw them immediately. You must ensure all images are fully loaded before attempting to render them on the canvas. A common pattern involves pre-loading all images and storing them in an array or object, indexed by slice. Each image will then be drawn onto its respective slice, often requiring scaling and positioning adjustments to fit correctly.
const canvas = document.getElementById('rouletteCanvas');
const ctx = canvas.getContext('2d');

const slices = [
    { label: 'Prize 1', image: 'prize1.png' },
    { label: 'Prize 2', image: 'prize2.png' },
    { label: 'Prize 3', image: 'prize3.png' }
];

const loadedImages = {};
let imagesLoadedCount = 0;

function loadImages() {
    return new Promise(resolve => {
        slices.forEach(slice => {
            const img = new Image();
            img.src = slice.image;
            img.onload = () => {
                loadedImages[slice.image] = img;
                imagesLoadedCount++;
                if (imagesLoadedCount === slices.length) {
                    resolve();
                }
            };
            img.onerror = () => {
                console.error(`Failed to load image: ${slice.image}`);
                imagesLoadedCount++; // Still count to avoid infinite loading
                if (imagesLoadedCount === slices.length) {
                    resolve();
                }
            };
        });
    });
}

// Usage:
// loadImages().then(() => {
//     drawRouletteWheel();
// });
JavaScript code for pre-loading all slice images before drawing.
Promise.all with an array of Image objects is an excellent way to ensure all assets are ready before rendering your wheel.Drawing Slices with Clipped Background Images
The core drawing logic involves iterating through each slice, calculating its start and end angles, and then using canvas clipping. For each slice, you'll first draw the arc path. Then, you'll use ctx.clip() to restrict subsequent drawing operations to only that path. Inside this clipped region, you can draw your pre-loaded image. Remember to save and restore the canvas state (ctx.save() and ctx.restore()) around each slice's drawing operation to prevent the clipping path from affecting other slices or elements.
function drawRouletteWheel() {
    const centerX = canvas.width / 2;
    const centerY = canvas.height / 2;
    const radius = Math.min(centerX, centerY) * 0.8;
    const totalSlices = slices.length;
    const sliceAngle = (2 * Math.PI) / totalSlices;
    let startAngle = 0;

    slices.forEach((slice, index) => {
        const endAngle = startAngle + sliceAngle;

        ctx.save(); // Save the current canvas state

        // Draw the slice path
        ctx.beginPath();
        ctx.moveTo(centerX, centerY);
        ctx.arc(centerX, centerY, radius, startAngle, endAngle);
        ctx.closePath();
        ctx.clip(); // Clip subsequent drawing to this path

        // Draw the background image
        const img = loadedImages[slice.image];
        if (img) {
            // Calculate position and scale for the image within the slice
            // This is a simplified example; actual positioning might be more complex
            const imgSize = radius * 2; // Example: make image cover the wheel diameter
            ctx.drawImage(img, centerX - radius, centerY - radius, imgSize, imgSize);
        }

        ctx.restore(); // Restore the canvas state (removes the clip path)

        // Optionally draw text or borders after restoring state
        // ctx.beginPath();
        // ctx.moveTo(centerX, centerY);
        // ctx.arc(centerX, centerY, radius, startAngle, endAngle);
        // ctx.strokeStyle = 'black';
        // ctx.lineWidth = 2;
        // ctx.stroke();

        startAngle = endAngle;
    });
}
JavaScript function to draw each roulette slice with a clipped background image.
drawImage parameters (source X, Y, width, height, destination X, Y, width, height) to achieve the desired effect, especially if images have different aspect ratios or you want them centered within the slice.Adding Interactivity and Spin Logic
Once the wheel is drawn, you'll want to add interactivity. This typically involves handling user clicks to initiate a spin and then animating the wheel's rotation. The animation can be achieved using requestAnimationFrame to smoothly update the wheel's rotation angle over time. Determining the winning slice involves calculating the final rotation angle and mapping it back to the corresponding slice based on its angular range.
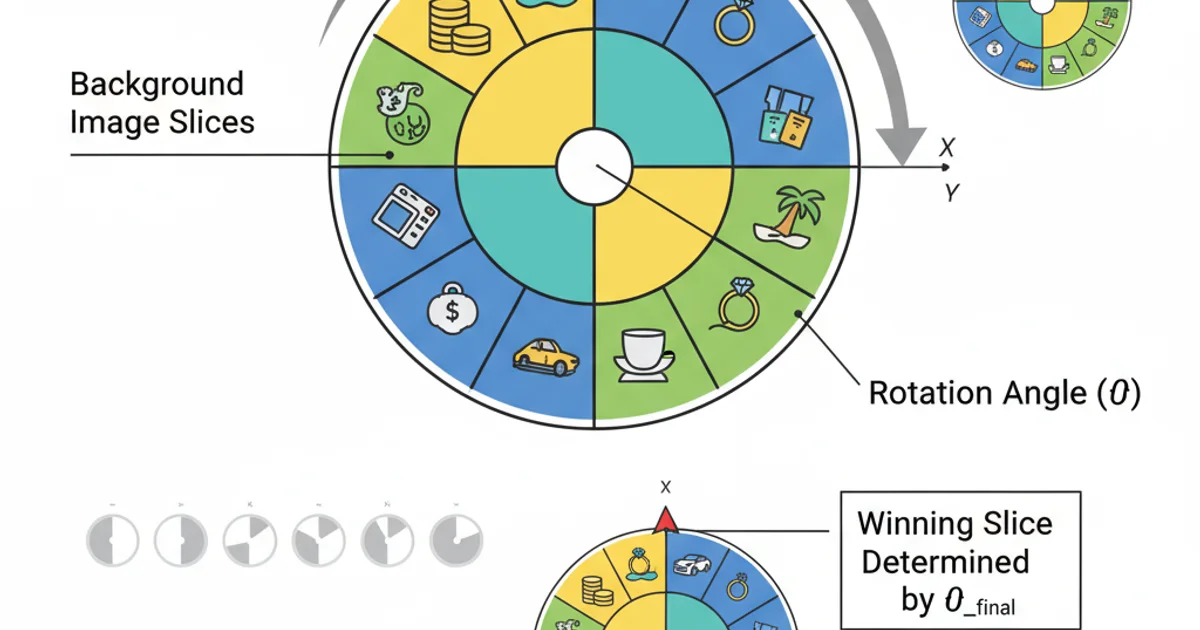
Visualizing roulette wheel rotation and winning slice determination.
The key to a realistic spin is a deceleration effect, where the wheel starts fast and gradually slows down. This can be implemented using easing functions or by progressively reducing the rotation speed. After the spin stops, you can then identify which slice is under the indicator by comparing the final rotation angle with the angular ranges of each slice.