Where does it create the 7zip compressed files
Categories:
Understanding 7-Zip Output: Where Do Your Compressed Files Go?

This article demystifies 7-Zip's default behavior for saving compressed archives, helping you locate your files and customize output destinations for better organization.
7-Zip is a popular, open-source file archiver known for its high compression ratio and support for various archive formats. While its powerful features are widely appreciated, new users often wonder: "Where does 7-Zip save my compressed files by default?" This article will guide you through 7-Zip's default output locations, explain how to specify custom paths, and provide tips for managing your archives effectively.
Default Output Location for 7-Zip Archives
By default, when you compress files or folders using 7-Zip, the resulting archive (.7z, .zip, etc.) is usually created in the same directory as the original files or folders you are compressing. This behavior is designed for convenience, keeping related files together. However, there are nuances depending on how you initiate the compression process.
flowchart TD
    A["User Selects Files/Folders"] --> B{"Right-Click Context Menu?"}
    B -->|Yes| C["7-Zip > Add to archive..."]
    C --> D{"Default Output Path?"}
    D -->|Yes| E["Same Directory as Source"]
    D -->|No| F["User Specifies Custom Path"]
    B -->|No| G["Open 7-Zip File Manager"]
    G --> H["Add button or File > Add to Archive..."]
    H --> I{"Default Output Path?"}
    I -->|Yes| J["Same Directory as Source"]
    I -->|No| K["User Specifies Custom Path"]
    E --> L["Archive Created"]
    F --> L
    J --> L
    K --> L
7-Zip Archive Creation Workflow and Default Output
Let's break down the common scenarios:
1. Using the Context Menu (Right-Click)
When you right-click on a file or folder in Windows Explorer and select 7-Zip > Add to archive..., the 'Add to Archive' dialog box appears. By default, the 'Archive' field will show a path that points to the same directory as your selected items. For example, if you're compressing C:\Users\YourName\Documents\MyProject and its contents, the archive will be created as C:\Users\YourName\Documents\MyProject.7z.
2. Using the 7-Zip File Manager
If you open the 7-Zip File Manager directly, navigate to the files you want to compress, select them, and then click the 'Add' button or go to File > Add to Archive..., the behavior is similar. The 'Archive' field in the dialog will default to the current directory you are browsing within the 7-Zip File Manager.
Specifying a Custom Output Directory
While the default behavior is often convenient, you'll frequently need to save archives to a different location, such as a dedicated 'Archives' folder, a network drive, or a USB stick. 7-Zip provides an easy way to do this within the 'Add to Archive' dialog.
The 'Add to Archive' dialog allows you to change the output path.
To change the output directory:
1. Open the 'Add to Archive' Dialog
Right-click the files/folders you want to compress, then select 7-Zip > Add to archive....
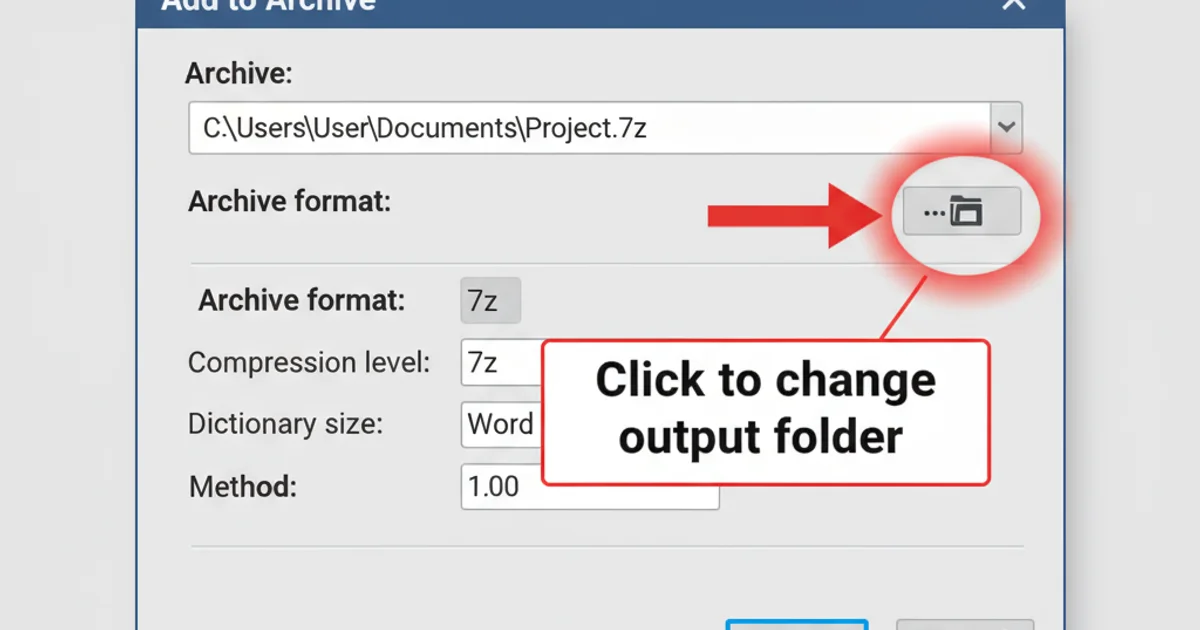
2. Browse for a New Location
In the 'Add to Archive' dialog, locate the 'Archive' field. To the right of this field, there's a button with three dots (...). Click this button to open a standard 'Save As' dialog box.
3. Select Your Desired Path
Navigate to the folder where you want to save your archive, type in the desired filename (if different from the default), and click 'Save'. The 'Archive' field in the 'Add to Archive' dialog will update to reflect your chosen path.
4. Create the Archive
Click 'OK' in the 'Add to Archive' dialog to begin the compression process. Your archive will be created in the specified custom location.
Command Line Compression and Output
For advanced users or scripting purposes, 7-Zip can also be used via the command line. When compressing from the command line, you have explicit control over the output path.
7z a "C:\Path\To\MyArchive.7z" "C:\Source\Folder\*"
7z a "D:\Backups\ProjectBackup.zip" "C:\Projects\MyProject\"
Examples of 7-Zip command-line compression with specified output paths.
In the command-line syntax:
7z ais the command to 'add' (compress) files to an archive.- The first path in quotes is the full path and filename of the output archive.
- The subsequent paths are the source files or folders to be compressed.
7z a MyArchive.7z C:\Source\Folder\*), the archive will be created in the current working directory of your command prompt.