Programmatically setting up a vpn on Android
Categories:
Programmatically Setting Up a VPN on Android

Learn how to implement an Android VPN Service, enabling your application to create and manage a secure, device-wide VPN connection.
Android's VpnService API provides a powerful mechanism for applications to establish and control a virtual private network (VPN) connection for the entire device. This allows developers to route all network traffic through their app, enabling features like secure browsing, content filtering, and network monitoring. This article will guide you through the essential steps and considerations for programmatically setting up a VPN on Android, from manifest declarations to managing the connection lifecycle.
Understanding the Android VpnService
The VpnService class is the cornerstone of VPN implementation on Android. It's a special type of service that runs in the background and allows your application to act as a VPN gateway. When your VpnService is active, it receives all IP packets destined for the internet and can then process, encrypt, and forward them to a remote VPN server. Similarly, it receives incoming packets from the VPN server and injects them back into the Android network stack.
flowchart TD
    A[Android App] --> B{Start VpnService}
    B --> C[User Authorization Request]
    C -- User Grants --> D[VpnService Running]
    D --> E[Establish VPN Tunnel (e.g., IPSec, OpenVPN)]
    E --> F[Configure Virtual Interface (IP, DNS, Routes)]
    F --> G[Intercept Network Traffic]
    G -- Encrypt/Forward --> H[Remote VPN Server]
    H -- Decrypt/Return --> G
    G --> I[Inject into Android Network Stack]
    I --> J[User Application]
    D -- Stop VPN --> K[VpnService Stopped]
Lifecycle and Data Flow of an Android VpnService
Key aspects of VpnService include:
- Permissions: Your app must declare the
BIND_VPN_SERVICEpermission in its manifest. - User Consent: Android requires explicit user consent before an app can establish a VPN connection. This is handled by an
Intentthat your app must launch. - Virtual Interface: The
VpnService.Builderclass is used to configure the virtual network interface, including its IP address, DNS servers, and routing rules. - Packet Handling: Your service will receive a file descriptor representing the virtual interface. You'll need to read outgoing packets from this descriptor, process them, and write incoming packets to it.
Manifest Declaration and User Consent
Before your application can even attempt to start a VPN service, you must declare it correctly in your AndroidManifest.xml file and obtain user permission. The BIND_VPN_SERVICE permission is a system-level permission that only the system can grant, ensuring that only legitimate VPN apps can use this API.
<manifest xmlns:android="http://schemas.android.com/apk/res/android"
    package="com.example.myvpnapp">

    <uses-permission android:name="android.permission.INTERNET" />

    <application
        ...
        <service
            android:name=".MyVpnService"
            android:permission="android.permission.BIND_VPN_SERVICE"
            android:exported="true">
            <intent-filter>
                <action android:name="android.net.VpnService" />
            </intent-filter>
        </service>
    </application>

</manifest>
After declaring the service, you need to request user consent. This is typically done when the user initiates the VPN connection from your app's UI. The VpnService.prepare() method returns an Intent that, if not null, must be launched to prompt the user for permission.
class MainActivity : AppCompatActivity() {

    companion object {
        private const val VPN_PERMISSION_REQUEST_CODE = 1001
    }

    fun startVpn(view: View) {
        val intent = VpnService.prepare(this)
        if (intent != null) {
            startActivityForResult(intent, VPN_PERMISSION_REQUEST_CODE)
        } else {
            // User already granted permission, or it's a system app
            onActivityResult(VPN_PERMISSION_REQUEST_CODE, RESULT_OK, null)
        }
    }

    override fun onActivityResult(requestCode: Int, resultCode: Int, data: Intent?) {
        super.onActivityResult(requestCode, resultCode, data)
        if (requestCode == VPN_PERMISSION_REQUEST_CODE) {
            if (resultCode == RESULT_OK) {
                // User granted permission, start your VpnService
                val vpnIntent = Intent(this, MyVpnService::class.java)
                startService(vpnIntent)
            } else {
                // User denied permission
                Toast.makeText(this, "VPN permission denied", Toast.LENGTH_SHORT).show()
            }
        }
    }
}
VpnService.prepare(). If it's not null, you must launch the Intent to get user consent. Attempting to start the VpnService without consent will result in a SecurityException.Implementing Your VpnService
The core logic of your VPN resides within your custom VpnService implementation. This is where you'll configure the virtual interface, establish the secure tunnel to your remote server, and handle packet forwarding.
class MyVpnService : VpnService() {

    private var vpnInterface: ParcelFileDescriptor? = null
    private var vpnThread: Thread? = null

    override fun onStartCommand(intent: Intent?, flags: Int, startId: Int): Int {
        if (vpnInterface == null) {
            startVpnConnection()
        }
        return START_STICKY
    }

    private fun startVpnConnection() {
        // 1. Build the VPN interface
        val builder = Builder()
            .addAddress("10.0.0.2", 32) // Virtual IP for the device
            .addRoute("0.0.0.0", 0)     // Route all traffic through VPN
            .addDnsServer("8.8.8.8")    // Google DNS
            .setSession("MyAwesomeVpn")
            .setMtu(1500)

        // Optional: Allow specific apps to bypass VPN or only allow specific apps
        // builder.addAllowedApplication("com.example.myapp")
        // builder.addDisallowedApplication("com.example.anotherapp")

        vpnInterface = builder.establish()

        if (vpnInterface != null) {
            // 2. Start a new thread to handle packet forwarding
            vpnThread = Thread {
                // Implement your secure tunnel logic here
                // Read from vpnInterface.fileDescriptor and write to remote server
                // Read from remote server and write to vpnInterface.fileDescriptor
                Log.d("MyVpnService", "VPN established. Handling packets...")
                // Example: Keep the thread alive until stopped
                while (!Thread.interrupted()) {
                    try {
                        Thread.sleep(1000) // Simulate work
                    } catch (e: InterruptedException) {
                        Thread.currentThread().interrupt()
                    }
                }
            }
            vpnThread?.start()
        } else {
            Log.e("MyVpnService", "Failed to establish VPN interface")
            stopSelf()
        }
    }

    override fun onRevoke() {
        // User revoked VPN permission or system stopped it
        Log.d("MyVpnService", "VPN revoked")
        stopVpnConnection()
    }

    override fun onDestroy() {
        super.onDestroy()
        stopVpnConnection()
    }

    private fun stopVpnConnection() {
        vpnThread?.interrupt()
        vpnThread = null
        try {
            vpnInterface?.close()
            vpnInterface = null
            Log.d("MyVpnService", "VPN connection stopped")
        } catch (e: IOException) {
            Log.e("MyVpnService", "Error closing VPN interface: ", e)
        }
    }
}
addAddress() and addRoute() methods are crucial. addAddress() assigns a virtual IP to the device within your VPN's network, while addRoute("0.0.0.0", 0) tells Android to route all traffic through your VPN. You can specify more granular routes if needed.Packet Handling and Secure Tunneling
The most complex part of a VpnService is handling the actual network packets. Once builder.establish() returns a ParcelFileDescriptor, you have a file descriptor that behaves like a network socket. You'll need to read bytes from this descriptor (outgoing traffic from the device), encrypt them, and send them to your remote VPN server. Conversely, you'll receive encrypted bytes from your server, decrypt them, and write them back to the ParcelFileDescriptor (incoming traffic to the device).
This typically involves:
- Creating a
FileInputStreamandFileOutputStreamfrom theParcelFileDescriptor. - Implementing a secure tunnel protocol (e.g., IPSec, OpenVPN, WireGuard, or a custom TLS/DTLS-based protocol) to communicate with your remote VPN server.
- Reading packets from the
FileInputStreamin a loop. - Processing packets: This includes encryption, compression, and encapsulating them according to your tunnel protocol.
- Sending packets over a secure socket (e.g.,
DatagramChannelfor UDP orSocketChannelfor TCP) to your VPN server. - Receiving packets from your VPN server.
- Processing incoming packets: Decryption, decompression, and decapsulation.
- Writing packets to the
FileOutputStreamto inject them back into the Android network stack.
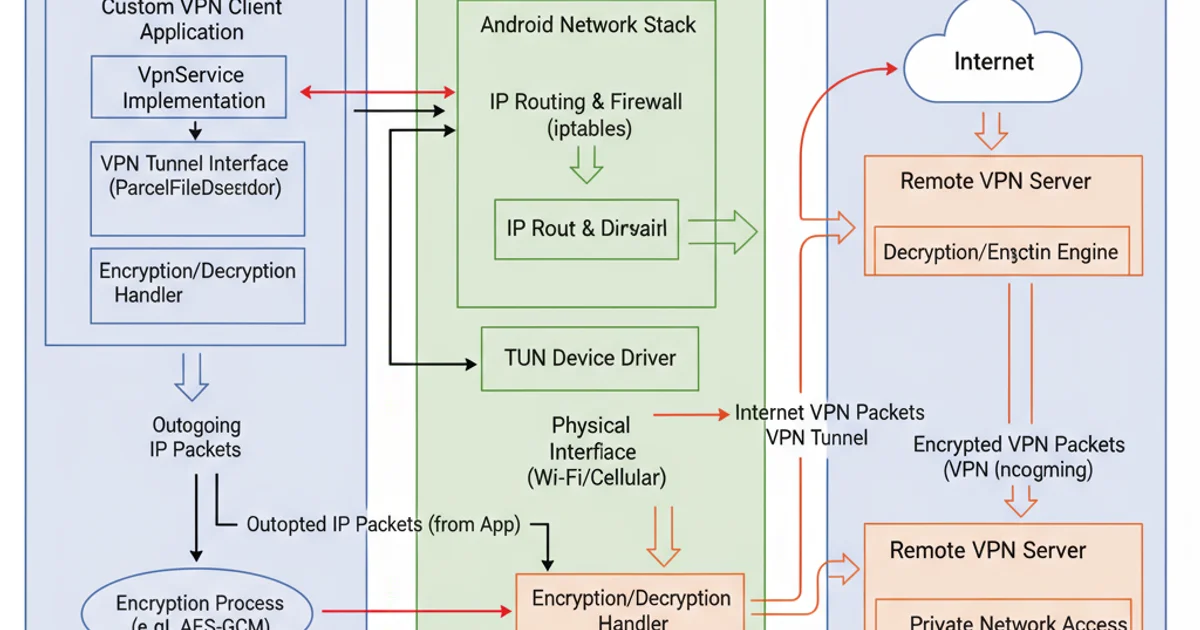
Detailed Packet Flow within the VpnService
Stopping and Managing the VPN
Properly managing the VPN lifecycle is crucial for a good user experience and system stability. Your VpnService should be able to start, stop, and handle system events gracefully.
The onRevoke() method is called when the user revokes VPN permission or the system stops the VPN for other reasons (e.g., another VPN starts). You should clean up resources in this method. The onDestroy() method is also important for ensuring all resources are released when your service is destroyed.
1. Declare Permissions and Service
Add the BIND_VPN_SERVICE permission and your VpnService declaration to AndroidManifest.xml.
2. Request User Consent
Call VpnService.prepare() and launch the returned Intent if it's not null, handling the result in onActivityResult().
3. Implement VpnService
Extend VpnService, override onStartCommand(), and use VpnService.Builder to configure the virtual interface (IP, routes, DNS).
4. Handle Packet Forwarding
In a separate thread, read packets from the ParcelFileDescriptor, implement your secure tunnel logic (encryption, decryption, communication with remote server), and write packets back.
5. Manage Lifecycle
Implement onRevoke() and onDestroy() to properly close the ParcelFileDescriptor and stop any background threads.