Amazon SES - Domain Verification Failure
Categories:
Troubleshooting Amazon SES Domain Verification Failures
Learn to diagnose and resolve common issues preventing successful domain verification in Amazon Simple Email Service (SES), ensuring your email sending capabilities.
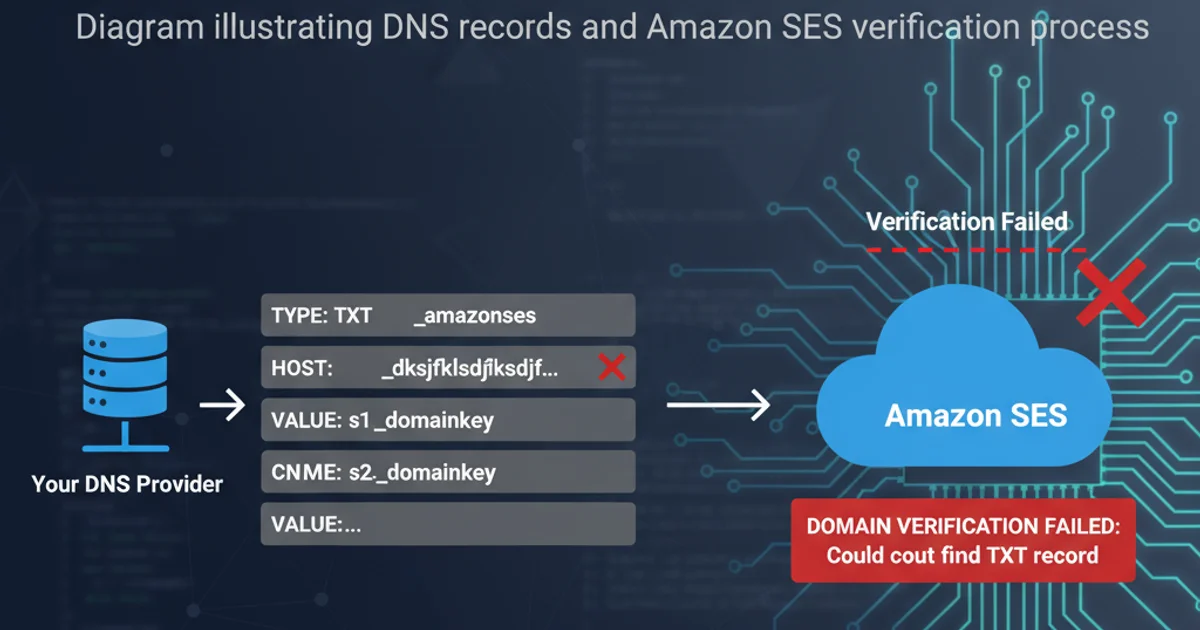
Amazon Simple Email Service (SES) is a cost-effective, flexible, and scalable email sending and receiving platform. Before you can send emails from a domain using SES, you must verify ownership of that domain. This verification process typically involves adding specific DNS records (TXT or CNAME) to your domain's DNS configuration. However, domain verification can sometimes fail, leading to frustration and delays. This article will guide you through the common causes of SES domain verification failures and provide practical troubleshooting steps to help you resolve them.
Understanding the SES Domain Verification Process
When you initiate domain verification in Amazon SES, AWS provides you with a set of DNS records that you need to add to your domain's DNS zone file. These records serve as proof that you control the domain. SES periodically checks your domain's DNS records to confirm the presence of these verification records. Once found and validated, your domain's status changes from 'pending verification' to 'verified'.
There are two primary methods for domain verification:
- TXT Record Verification: This is the traditional method where you add a TXT record containing a specific verification string provided by SES.
- CNAME Record Verification (Easy DKIM): When you enable Easy DKIM for a domain, SES provides three CNAME records. Adding these records not only verifies your domain but also configures DKIM signing for improved email deliverability. If you're verifying a domain for the first time, using Easy DKIM is generally recommended as it covers both verification and DKIM setup.
sequenceDiagram
    actor User
    participant AWS SES
    participant DNS Provider

    User->>AWS SES: Initiate Domain Verification
    AWS SES-->>User: Provide DNS Records (TXT/CNAME)
    User->>DNS Provider: Add Records to DNS Zone
    Note over DNS Provider,User: DNS Propagation Time (up to 72 hours)
    loop Verification Check
        AWS SES->>DNS Provider: Query DNS Records
        alt Records Found & Match
            DNS Provider-->>AWS SES: Return Verification Records
            AWS SES->>AWS SES: Validate Records
            AWS SES-->>User: Domain Verified!
            break
        else Records Not Found or Mismatch
            DNS Provider-->>AWS SES: Records Missing/Incorrect
            AWS SES-->>User: Domain Verification Pending/Failed
            Note over AWS SES,User: User must re-check DNS configuration
        end
    end
Amazon SES Domain Verification Flow
Common Causes of Verification Failure
Several factors can lead to a domain verification failure in Amazon SES. Understanding these common pitfalls is the first step towards a quick resolution.
1. Incorrect DNS Record Entry
This is by far the most frequent cause. DNS records are case-sensitive in some parts and require exact values. Common mistakes include:
- Typographical Errors: A single typo in the record name or value.
- Missing Period at the End: Some DNS providers automatically append the domain name, while others require a trailing period for fully qualified domain names (FQDNs). For example, if SES gives
_amazonses.yourdomain.comand your DNS provider expects_amazonses(and appendsyourdomain.com), adding the full string will result in_amazonses.yourdomain.com.yourdomain.com. - Incorrect Record Type: Using a CNAME record when a TXT record is required, or vice-versa.
- Incorrect Host/Name Field: The 'Host' or 'Name' field for the record must exactly match what SES provides (e.g.,
_amazonsesor_d0a1b2c3d4e5f6g7h8i9j0k1l2m3n4o5.yourdomain.com). - Incorrect Value/Target Field: The 'Value' or 'Target' field must contain the exact string provided by SES, including any quotes if specified.
2. DNS Propagation Delays
After you add or modify DNS records, it takes time for these changes to propagate across the internet's DNS servers. This propagation time can range from a few minutes to up to 72 hours, although it's typically much faster (within an hour or two) for most providers. SES will only be able to verify your domain once the records have fully propagated and are visible to its DNS resolvers.
3. Existing Conflicting Records
Sometimes, an existing DNS record might conflict with the new record you're trying to add. For example, if you already have a CNAME record for _amazonses.yourdomain.com and you're trying to add a TXT record with the same name, some DNS providers might not allow it or might prioritize one over the other. This is less common but can occur.
4. DNS Provider Specifics
Different DNS providers (e.g., Route 53, GoDaddy, Cloudflare, Namecheap) have slightly different interfaces and ways of handling DNS record entries. What works for one provider might need a slight adjustment for another. Always consult your DNS provider's documentation if you're unsure how to add a specific record type.
Troubleshooting Steps
Follow these steps to systematically diagnose and resolve your SES domain verification issues.
1. Step 1: Verify DNS Record Details in SES
Navigate to the Amazon SES console. In the navigation pane, choose Verified identities. Select your domain. Under the 'Details' tab, you will see the exact DNS records (TXT or CNAME) that SES expects. Copy these values precisely.
2. Step 2: Check Your DNS Provider's Configuration
Log in to your domain's DNS provider (e.g., Route 53, GoDaddy, Cloudflare). Locate your domain's DNS management section. Compare the records you entered with the values provided by SES. Pay close attention to:
- Record Type: Is it TXT or CNAME?
- Host/Name: Does it match exactly? Remember the trailing period issue. For example, if SES gives
_amazonses.yourdomain.com, try entering just_amazonsesif your provider automatically appends the domain. - Value/Target: Is the string identical, including any quotes?
- TTL (Time To Live): While not a cause of failure, a lower TTL (e.g., 300 seconds) will speed up propagation for future changes.
3. Step 3: Use a DNS Lookup Tool
Use an online DNS lookup tool (e.g., dig command-line utility, mxtoolbox.com, whatsmydns.net) to check if your DNS records are publicly visible. For a TXT record, query for the TXT record type. For CNAME records (Easy DKIM), query for CNAME records. Enter the full record name (e.g., _amazonses.yourdomain.com or _d0a1b2c3d4e5f6g7h8i9j0k1l2m3n4o5.yourdomain.com). If the records are not visible, it indicates a propagation delay or an incorrect entry at your DNS provider.
4. Step 4: Wait for DNS Propagation
If your DNS records appear correct but SES still shows 'pending verification', it's likely a propagation issue. Wait for a few hours and re-check the SES console. You can also periodically use a DNS lookup tool to monitor propagation.
5. Step 5: Remove Conflicting Records
If you suspect a conflict, temporarily remove any other records that use the exact same 'Host' or 'Name' as the SES verification record, then re-add the SES record.
6. Step 6: Re-initiate Verification (If Necessary)
In rare cases, if you've made multiple changes and are still stuck, you might consider deleting the domain identity in SES and re-adding it. This will generate a new set of verification records, giving you a fresh start. Be cautious with this step if you have existing configurations tied to the domain.
By systematically following these troubleshooting steps, you should be able to identify and resolve most Amazon SES domain verification failures. Patience is key, especially when dealing with DNS propagation.