How do you port a Cocoa/Mac application to Windows?
Categories:
Porting Your Cocoa/macOS Application to Windows: A Comprehensive Guide
Explore the challenges and strategies involved in migrating a native macOS application built with Cocoa to the Windows platform, covering architectural considerations, UI frameworks, and code adaptation.
Migrating a Cocoa-based macOS application to Windows is a significant undertaking that requires careful planning and execution. Unlike cross-platform frameworks that abstract away OS-specific details, Cocoa is deeply integrated with macOS, leveraging its unique APIs, UI paradigms, and underlying technologies. This article will guide you through the key considerations, architectural decisions, and technical challenges you'll encounter when porting your application, helping you navigate the complexities of bridging these two distinct operating systems.
Understanding the Core Differences
The fundamental difference between macOS and Windows lies in their operating system architectures, API sets, and user interface frameworks. Cocoa applications are built upon Objective-C or Swift, utilizing Apple's AppKit for UI and Foundation for core services. Windows applications, conversely, typically use C++ with Win32 API, MFC, or more modern frameworks like WPF (.NET) or UWP. Bridging this gap requires either a complete rewrite, a cross-platform framework adoption, or a hybrid approach.
flowchart TD
    A[macOS Cocoa App] --> B{Porting Strategy?}
    B -->|Rewrite| C[Windows Native (C++/Win32/WPF/UWP)]
    B -->|Cross-Platform Framework| D[Qt/Electron/Xamarin/Flutter]
    B -->|Hybrid (Core Logic Shared)| E[Core Logic (C++/Rust) + Native UI]
    C --> F[Significant Effort, Native Look/Feel]
    D --> G[Moderate Effort, Cross-Platform Look/Feel]
    E --> H[Moderate Effort, Native-ish Look/Feel]
    F & G & H --> I[Windows App]
Overview of common porting strategies from macOS Cocoa to Windows.
Architectural Considerations and Code Adaptation
Before diving into code, analyze your application's architecture. Identify the layers that are tightly coupled to Cocoa and those that are more platform-agnostic. Typically, the UI layer (AppKit) and any macOS-specific system integrations (e.g., Core Animation, Grand Central Dispatch for specific patterns, Apple Event Manager) will require the most significant changes. Your application's core logic, if well-separated, might be portable with fewer modifications, especially if it's written in C++ or a language with good cross-platform support.
Choosing a Windows UI Framework
The choice of UI framework on Windows is critical and will dictate much of your porting effort. Each option has its pros and cons regarding development speed, native look and feel, and performance.
1. Native Windows Development (C++/Win32, MFC, WPF, UWP)
This approach offers the best native look and feel and performance but requires a deep understanding of Windows APIs and often a complete UI rewrite. WPF (Windows Presentation Foundation) is a popular choice for modern desktop applications using .NET, offering a declarative UI with XAML. UWP (Universal Windows Platform) is suitable for apps targeting the Microsoft Store and various Windows devices.
2. Cross-Platform Frameworks
Frameworks like Qt, Electron, Xamarin, or Flutter allow you to write a single codebase that runs on both macOS and Windows (and often Linux, iOS, and Android). While they reduce porting effort, they might not always achieve a perfectly native look and feel, and can introduce their own set of dependencies and performance characteristics.
3. Hybrid Approaches
This involves keeping your core logic in a platform-agnostic language (e.g., C++, Rust) and writing separate native UI layers for macOS (Cocoa) and Windows (e.g., WPF). This offers a good balance between code reuse and native user experience.
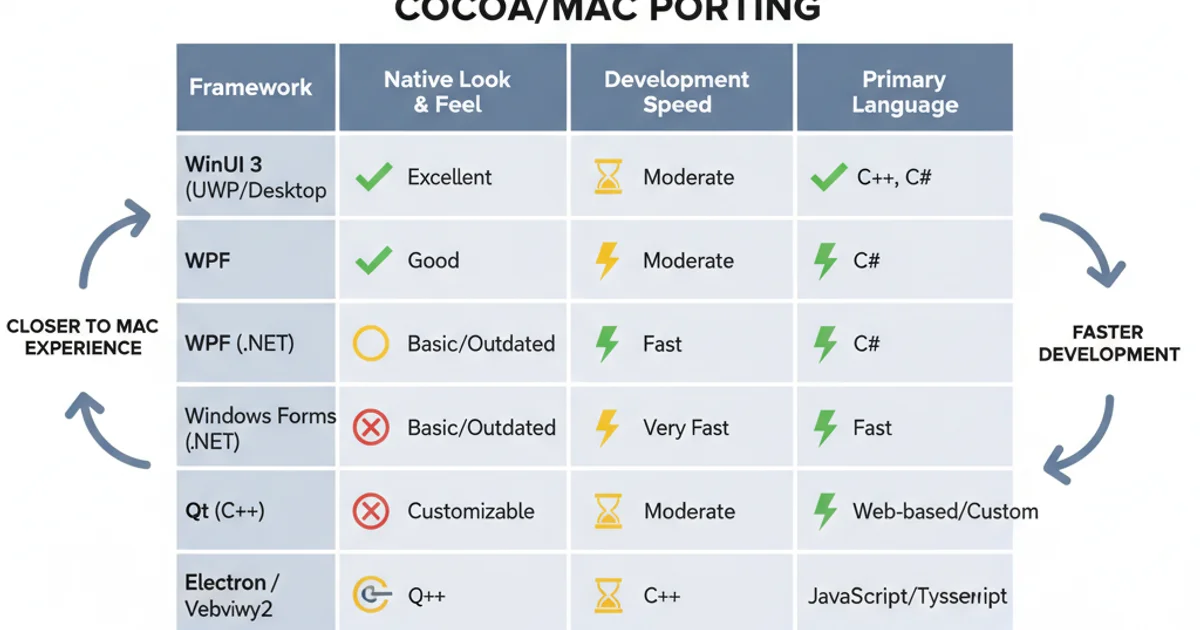
Comparison of Windows UI Frameworks for Porting
Handling Platform-Specific APIs and Services
Many Cocoa APIs have no direct equivalent on Windows. You'll need to find Windows alternatives for functionalities such as:
- File System Access:
NSFileManagervs. Win32 File I/O functions or .NETSystem.IO. - Networking:
URLSessionvs. WinHTTP, WinSock, or .NETHttpClient. - Concurrency: Grand Central Dispatch (GCD) vs. C++11 threads,
std::async, or .NET Task Parallel Library. - Graphics and Drawing: Core Graphics, Core Animation vs. GDI+, DirectX, or WPF's rendering engine.
- User Defaults/Preferences:
UserDefaultsvs. Windows Registry or application-specific configuration files. - Inter-Process Communication (IPC): Distributed Objects, XPC vs. Named Pipes, Memory-Mapped Files, or COM.
For each Cocoa API, you'll need to identify the corresponding Windows API or library and adapt your code accordingly. This often involves creating platform-specific wrappers or abstraction layers.
// macOS: Saving a preference
[[NSUserDefaults standardUserDefaults] setObject:@"Hello" forKey:@"Greeting"];
Example of saving a preference in macOS using NSUserDefaults.
// Windows (WPF/C#): Saving a preference
Properties.Settings.Default.Greeting = "Hello";
Properties.Settings.Default.Save();
Equivalent preference saving in Windows using C# and application settings.
Testing and Debugging
Thorough testing is paramount during the porting process. You'll need to establish a testing environment on Windows, including various versions of the OS and potentially different hardware configurations. Debugging tools like Visual Studio's debugger will become indispensable. Pay close attention to memory management, threading issues, and UI responsiveness, as these can behave differently across platforms.
1. Step 1: Analyze and Architect
Perform a detailed analysis of your existing macOS application. Identify platform-dependent code, separate business logic from UI, and choose a suitable Windows UI framework and porting strategy.
2. Step 2: Set Up Development Environment
Install Visual Studio (or your chosen IDE), relevant SDKs, and any necessary cross-platform framework tools on a Windows machine. Configure your build system for Windows.
3. Step 3: Port Core Logic
Migrate platform-agnostic core logic first. This might involve compiling existing C++ code, adapting Swift/Objective-C to C++ or C#, or integrating a cross-platform language runtime.
4. Step 4: Implement Windows UI
Rebuild the user interface using your chosen Windows UI framework (e.g., WPF, Win32, Qt). Map Cocoa UI elements and behaviors to their Windows equivalents.
5. Step 5: Adapt Platform-Specific Services
Replace all macOS-specific API calls (file system, networking, concurrency, preferences, etc.) with their Windows counterparts. Create abstraction layers where beneficial.
6. Step 6: Test, Debug, and Optimize
Rigorously test the application on various Windows versions and configurations. Use Windows debugging tools to identify and fix bugs. Optimize for performance and ensure a native user experience.