google maps flight path
Categories:
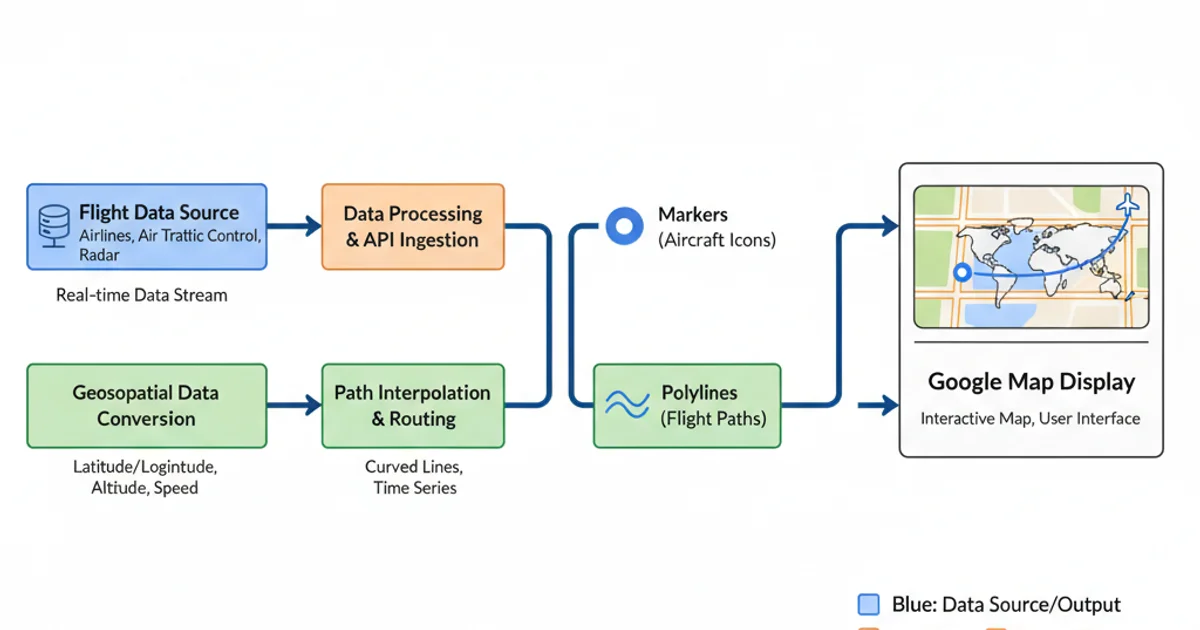
Visualizing Flight Paths with Google Maps API v3

Learn how to integrate Google Maps API v3 into your web applications to display dynamic flight paths, connecting origin and destination points with polylines and markers.
The Google Maps JavaScript API v3 provides a powerful and flexible way to embed interactive maps into your web pages. A common and visually engaging application is to display flight paths, illustrating routes between different locations. This article will guide you through the process of setting up a basic map, adding markers for origin and destination, and drawing a polyline to represent the flight path. We'll cover the essential JavaScript code and best practices for a smooth implementation.
Setting Up Your Google Map
Before drawing any flight paths, you need to initialize a Google Map on your web page. This involves including the Google Maps API script, defining a div element to hold the map, and writing JavaScript to create a new google.maps.Map instance. You'll need an API key, which you can obtain from the Google Cloud Console, to use the service. Ensure your API key is properly restricted to prevent unauthorized use.
<!DOCTYPE html>
<html>
<head>
    <title>Google Maps Flight Path</title>
    <style>
        #map {
            height: 500px;
            width: 100%;
        }
    </style>
</head>
<body>
    <div id="map"></div>
    <script>
        function initMap() {
            const mapOptions = {
                zoom: 4,
                center: { lat: 37.0902, lng: -95.7129 } // Centered on the US
            };
            const map = new google.maps.Map(document.getElementById('map'), mapOptions);
        }
    </script>
    <script async defer src="https://maps.googleapis.com/maps/api/js?key=YOUR_API_KEY&callback=initMap"></script>
</body>
</html>
Basic HTML structure and JavaScript for initializing a Google Map.
YOUR_API_KEY with your actual Google Maps API key. Remember to enable the 'Maps JavaScript API' in your Google Cloud project.Adding Markers and Drawing the Flight Path
To represent a flight path, we typically need at least two points: an origin and a destination. These can be marked using google.maps.Marker objects. The path itself is drawn using a google.maps.Polyline. Polylines are lines that connect a series of coordinates in an ordered sequence. You can customize their appearance, such as color, weight, and opacity, to match your application's design.
flowchart TD
    A[Initialize Map] --> B{Define Origin & Destination Coordinates}
    B --> C[Create Origin Marker]
    B --> D[Create Destination Marker]
    C --> E[Define Polyline Path Array]
    D --> E
    E --> F[Create Polyline Object]
    F --> G[Set Polyline on Map]
    G --> H[Display Markers & Path]
Workflow for adding markers and drawing a flight path on Google Maps.
function initMap() {
    const mapOptions = {
        zoom: 4,
        center: { lat: 37.0902, lng: -95.7129 }
    };
    const map = new google.maps.Map(document.getElementById('map'), mapOptions);

    // Define origin and destination coordinates
    const origin = { lat: 34.0522, lng: -118.2437 }; // Los Angeles
    const destination = { lat: 40.7128, lng: -74.0060 }; // New York

    // Create origin marker
    new google.maps.Marker({
        position: origin,
        map: map,
        title: 'Los Angeles'
    });

    // Create destination marker
    new google.maps.Marker({
        position: destination,
        map: map,
        title: 'New York'
    });

    // Define the path for the polyline
    const flightPathCoordinates = [
        origin,
        destination
    ];

    // Create the polyline
    const flightPath = new google.maps.Polyline({
        path: flightPathCoordinates,
        geodesic: true, // Ensures the line follows the curvature of the Earth
        strokeColor: '#FF0000',
        strokeOpacity: 1.0,
        strokeWeight: 2
    });

    // Set the polyline on the map
    flightPath.setMap(map);

    // Optionally, fit the map to show both markers
    const bounds = new google.maps.LatLngBounds();
    bounds.extend(origin);
    bounds.extend(destination);
    map.fitBounds(bounds);
}
JavaScript code to add markers and draw a flight path between two points.
geodesic: true for the polyline ensures that the line follows the shortest path on the surface of the Earth, which is crucial for accurate flight path representation over long distances.Enhancing Flight Paths with Dynamic Data
Real-world flight paths often involve more than just two points. You might want to display multiple flights, update paths in real-time, or add intermediate waypoints. This can be achieved by dynamically generating coordinates and iterating through data to create multiple markers and polylines. Consider using an array of flight objects, each containing origin, destination, and perhaps additional metadata, to manage complex scenarios.
Conceptual diagram of dynamic flight path data flow.
function initMap() {
    const mapOptions = {
        zoom: 3,
        center: { lat: 0, lng: 0 } // Global view
    };
    const map = new google.maps.Map(document.getElementById('map'), mapOptions);

    const flights = [
        { id: 'FL101', origin: { lat: 34.0522, lng: -118.2437 }, destination: { lat: 40.7128, lng: -74.0060 }, color: '#FF0000' }, // LA to NY
        { id: 'FL202', origin: { lat: 51.5074, lng: -0.1278 }, destination: { lat: 35.6895, lng: 139.6917 }, color: '#0000FF' }  // London to Tokyo
    ];

    flights.forEach(flight => {
        // Add origin marker
        new google.maps.Marker({
            position: flight.origin,
            map: map,
            title: `Origin: ${flight.id}`
        });

        // Add destination marker
        new google.maps.Marker({
            position: flight.destination,
            map: map,
            title: `Destination: ${flight.id}`
        });

        // Draw flight path
        const flightPath = new google.maps.Polyline({
            path: [flight.origin, flight.destination],
            geodesic: true,
            strokeColor: flight.color,
            strokeOpacity: 1.0,
            strokeWeight: 2
        });
        flightPath.setMap(map);
    });

    // Adjust map bounds to fit all flights
    const bounds = new google.maps.LatLngBounds();
    flights.forEach(flight => {
        bounds.extend(flight.origin);
        bounds.extend(flight.destination);
    });
    map.fitBounds(bounds);
}
Example of displaying multiple flight paths from an array of flight data.