How to create image in Java
Categories:
Creating and Manipulating Images in Java
Learn how to generate, load, save, and modify images programmatically using Java's javax.imageio package and the AWT BufferedImage class.
Java provides robust capabilities for image manipulation through its standard libraries, primarily java.awt.image.BufferedImage and the javax.imageio package. Whether you need to generate images from scratch, load existing ones, apply filters, or save them in various formats, Java offers the tools to accomplish these tasks. This article will guide you through the fundamental concepts and practical examples of image creation and processing in Java.
Understanding BufferedImage
The BufferedImage class is the cornerstone of image handling in Java. It represents an image with an accessible buffer of image data. You can think of it as a canvas where you can draw, paint, and manipulate pixels. It supports various image types, color models, and raster data organizations, making it highly versatile for different image processing needs.
classDiagram
    class Image {
        +getWidth(): int
        +getHeight(): int
    }
    class RenderedImage {
        +getData(): Raster
    }
    class WritableRenderedImage {
        +setData(Raster r)
    }
    class BufferedImage {
        +BufferedImage(width, height, imageType)
        +getGraphics(): Graphics2D
        +getRGB(x, y): int
        +setRGB(x, y, rgb): void
        +getType(): int
    }
    Image <|-- RenderedImage
    RenderedImage <|-- WritableRenderedImage
    WritableRenderedImage <|-- BufferedImage
    Graphics2D --o BufferedImage : draws on
Class hierarchy for BufferedImage and related interfaces
Creating a New Image Programmatically
To create a new image from scratch, you instantiate a BufferedImage object, specifying its width, height, and type. The image type determines its color model and data storage. Common types include TYPE_INT_RGB for standard RGB images and TYPE_INT_ARGB for RGB with an alpha channel (transparency). Once created, you can obtain a Graphics2D object from the BufferedImage to draw shapes, text, or fill areas with colors.
import java.awt.Color;
import java.awt.Graphics2D;
import java.awt.image.BufferedImage;
import java.io.File;
import java.io.IOException;
import javax.imageio.ImageIO;

public class ImageCreator {

    public static void main(String[] args) {
        int width = 200;
        int height = 100;

        // Create a BufferedImage object
        BufferedImage image = new BufferedImage(width, height, BufferedImage.TYPE_INT_RGB);

        // Get a Graphics2D object to draw on the image
        Graphics2D g2d = image.createGraphics();

        // Fill the background with white
        g2d.setColor(Color.WHITE);
        g2d.fillRect(0, 0, width, height);

        // Draw a red rectangle
        g2d.setColor(Color.RED);
        g2d.fillRect(20, 20, 50, 50);

        // Draw some blue text
        g2d.setColor(Color.BLUE);
        g2d.drawString("Hello Java!", 80, 50);

        // Dispose of the Graphics2D object to release resources
        g2d.dispose();

        // Save the image to a file
        try {
            File outputFile = new File("my_generated_image.png");
            ImageIO.write(image, "png", outputFile);
            System.out.println("Image created successfully at: " + outputFile.getAbsolutePath());
        } catch (IOException e) {
            System.err.println("Error saving image: " + e.getMessage());
        }
    }
}
Example of creating a BufferedImage, drawing on it, and saving it as a PNG file.
dispose() on the Graphics2D object after you are done drawing. This releases system resources associated with it, preventing potential memory leaks, especially in applications that perform frequent image operations.Loading and Saving Existing Images
The javax.imageio.ImageIO class is your primary tool for reading and writing image files. It supports various formats like PNG, JPEG, GIF, and BMP, provided the necessary Image I/O plugins are available (which they usually are for standard formats). The read() method loads an image from a File, InputStream, or URL, while the write() method saves a RenderedImage (like BufferedImage) to a File or OutputStream in a specified format.
import java.awt.image.BufferedImage;
import java.io.File;
import java.io.IOException;
import javax.imageio.ImageIO;

public class ImageLoaderSaver {

    public static void main(String[] args) {
        // Assuming 'my_generated_image.png' exists from the previous example
        File inputFile = new File("my_generated_image.png");
        BufferedImage loadedImage = null;

        // Load an image
        try {
            loadedImage = ImageIO.read(inputFile);
            System.out.println("Image loaded successfully. Dimensions: " + loadedImage.getWidth() + "x" + loadedImage.getHeight());
        } catch (IOException e) {
            System.err.println("Error loading image: " + e.getMessage());
            return;
        }

        // Example: Convert to grayscale and save as JPEG
        if (loadedImage != null) {
            BufferedImage grayscaleImage = new BufferedImage(
                loadedImage.getWidth(), loadedImage.getHeight(), BufferedImage.TYPE_BYTE_GRAY);

            for (int y = 0; y < loadedImage.getHeight(); y++) {
                for (int x = 0; x < loadedImage.getWidth(); x++) {
                    int rgb = loadedImage.getRGB(x, y);
                    int alpha = (rgb >> 24) & 0xFF;
                    int red = (rgb >> 16) & 0xFF;
                    int green = (rgb >> 8) & 0xFF;
                    int blue = rgb & 0xFF;

                    // Simple grayscale conversion (average of R, G, B)
                    int gray = (red + green + blue) / 3;
                    int newRgb = (alpha << 24) | (gray << 16) | (gray << 8) | gray;
                    grayscaleImage.setRGB(x, y, newRgb);
                }
            }

            try {
                File outputJpegFile = new File("grayscale_image.jpg");
                ImageIO.write(grayscaleImage, "jpg", outputJpegFile);
                System.out.println("Grayscale image saved successfully at: " + outputJpegFile.getAbsolutePath());
            } catch (IOException e) {
                System.err.println("Error saving grayscale image: " + e.getMessage());
            }
        }
    }
}
Loading an image, converting it to grayscale, and saving it in JPEG format.
ImageIO automatically determines the appropriate writer based on this string. If you need more control over compression or other format-specific parameters, you can use ImageIO.getImageWritersByFormatName() and ImageWriter.write() with ImageWriteParam.Common Image Manipulation Operations
Beyond simple drawing, BufferedImage combined with Graphics2D allows for a wide range of transformations and manipulations. You can scale, rotate, translate, and shear images. For pixel-level operations, you can directly access and modify pixel data using getRGB(x, y) and setRGB(x, y, rgb) methods, as demonstrated in the grayscale conversion example. More complex operations often involve java.awt.image.BufferedImageOp implementations like AffineTransformOp for geometric transformations or custom filters.
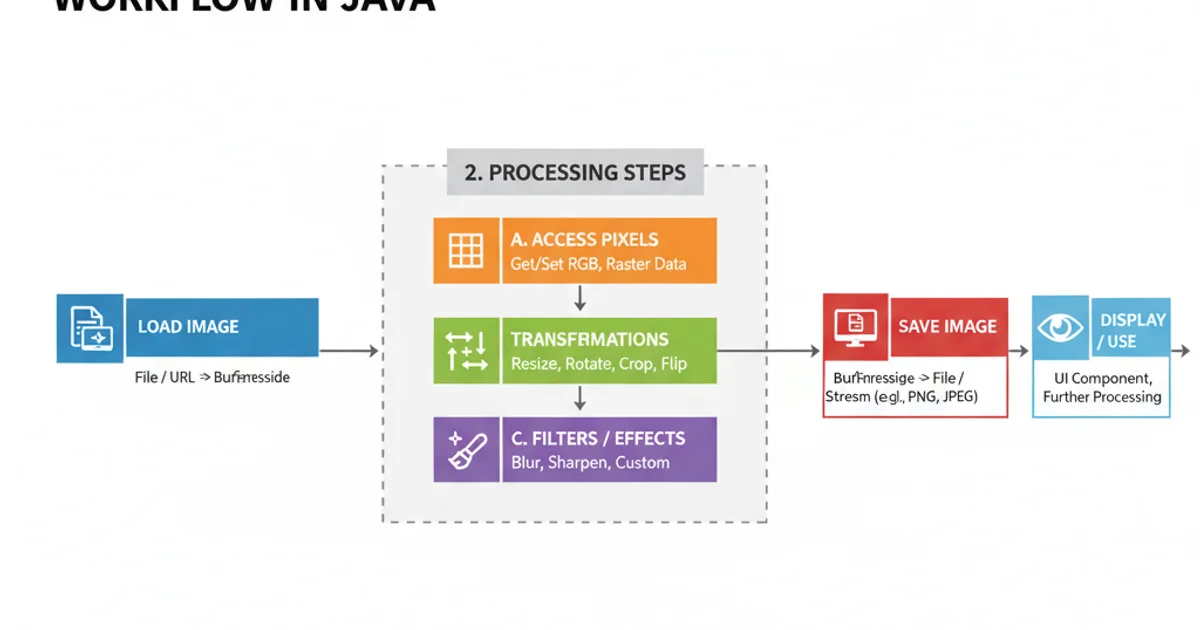
Typical workflow for image processing in Java.
flowchart TD
    A[Start: Image File] --> B{ImageIO.read(File)};
    B --> C[BufferedImage loadedImage];
    C --> D{Create new BufferedImage for output};
    D --> E[Get Graphics2D from output image];
    E --> F{Perform drawing/pixel manipulation};
    F --> G[Dispose Graphics2D];
    G --> H{ImageIO.write(outputImage, format, File)};
    H --> I[End: Processed Image File];
    C --> J{Direct Pixel Manipulation (getRGB/setRGB)};
    J --> D;
Flowchart illustrating the general process of loading, manipulating, and saving an image.