Unity3D Quit Android Game with user prompt
Categories:
Implementing a User-Friendly Quit Prompt in Unity3D for Android
Learn how to gracefully exit your Unity3D Android game by presenting a user confirmation prompt, preventing accidental exits and improving user experience.
Exiting a mobile game abruptly can be frustrating for players. On Android, pressing the back button often closes the application immediately. To enhance user experience, it's best practice to implement a confirmation prompt before quitting, giving players a chance to reconsider or save their progress. This article will guide you through creating such a system in Unity3D for your Android builds.
Understanding Android's Back Button Behavior
On Android devices, the back button is a fundamental navigation control. By default, in a Unity application, pressing the back button will often lead to the application being minimized or closed, depending on the current scene and how Unity handles the activity lifecycle. To override this default behavior and introduce a custom quit prompt, we need to detect when the back button is pressed and then present our own UI.
flowchart TD
    A[User Presses Back Button]
    B{Is Quit Prompt Active?}
    C{Is User in Main Menu/Game?}
    D[Show Quit Confirmation Dialog]
    E[User Confirms Quit]
    F[Application.Quit()]
    G[User Cancels Quit]
    H[Resume Game/Menu]
    I[Navigate Back in Game/Menu]

    A --> B
    B -- No --> C
    C -- Yes --> D
    C -- No --> I
    D --> E
    D --> G
    E --> F
    G --> H
    B -- Yes --> H
Flowchart of Android Back Button Logic with Quit Prompt
Implementing the Quit Prompt Logic
The core of our solution involves detecting the KeyCode.Escape input (which corresponds to the Android back button) and then activating a UI panel that asks the user for confirmation. This panel should have two buttons: 'Yes' (to quit) and 'No' (to cancel). We'll use a simple C# script attached to a GameObject in our scene to manage this logic.
using UnityEngine;
using UnityEngine.UI;

public class QuitPromptManager : MonoBehaviour
{
    public GameObject quitPanel;

    void Start()
    {
        // Ensure the quit panel is hidden at the start
        if (quitPanel != null)
        {
            quitPanel.SetActive(false);
        }
    }

    void Update()
    {
        // Detect Android back button press (KeyCode.Escape)
        if (Input.GetKeyDown(KeyCode.Escape))
        {
            // If the quit panel is already active, assume user wants to cancel
            // Or, if it's not active, show it.
            if (quitPanel != null)
            {
                if (quitPanel.activeSelf)
                {
                    CancelQuit();
                }
                else
                {
                    ShowQuitPrompt();
                }
            }
            else
            {
                // If no panel is assigned, just quit directly (fallback)
                Application.Quit();
            }
        }
    }

    public void ShowQuitPrompt()
    {
        if (quitPanel != null)
        {
            quitPanel.SetActive(true);
        }
    }

    public void ConfirmQuit()
    {
        Debug.Log("Quitting application...");
        Application.Quit();
    }

    public void CancelQuit()
    {
        if (quitPanel != null)
        {
            quitPanel.SetActive(false);
        }
    }
}
C# script for managing the quit prompt.
Setting Up the UI in Unity
To make this script functional, you'll need to create a UI Panel in your Unity scene that serves as the quit confirmation dialog. This panel should contain text (e.g., 'Do you want to quit?') and two buttons: one for 'Yes' and one for 'No'.
- Create a UI Canvas: If you don't have one, right-click in the Hierarchy -> UI -> Canvas.
- Create a Panel: Right-click on the Canvas -> UI -> Panel. Name it
QuitPanel. - Add Text: Inside
QuitPanel, add a UI Text element (Right-clickQuitPanel-> UI -> Text - TextMeshPro or Legacy Text) and set its content to something like "Do you really want to quit?". - Add Buttons: Inside
QuitPanel, add two UI Buttons. Name themYesButtonandNoButton.- Set the text of
YesButtonto "Yes". - Set the text of
NoButtonto "No".
- Set the text of
- Assign Script: Create an empty GameObject in your scene (e.g.,
GameManager) and attach theQuitPromptManagerscript to it. - Link UI to Script: In the Inspector for
GameManager, drag yourQuitPanelGameObject into theQuit Panelfield of theQuitPromptManagerscript. - Configure Button Events: For
YesButton, add anOnClick()event, drag theGameManagerGameObject into the object field, and selectQuitPromptManager.ConfirmQuitfrom the function dropdown. Do the same forNoButton, but selectQuitPromptManager.CancelQuit.
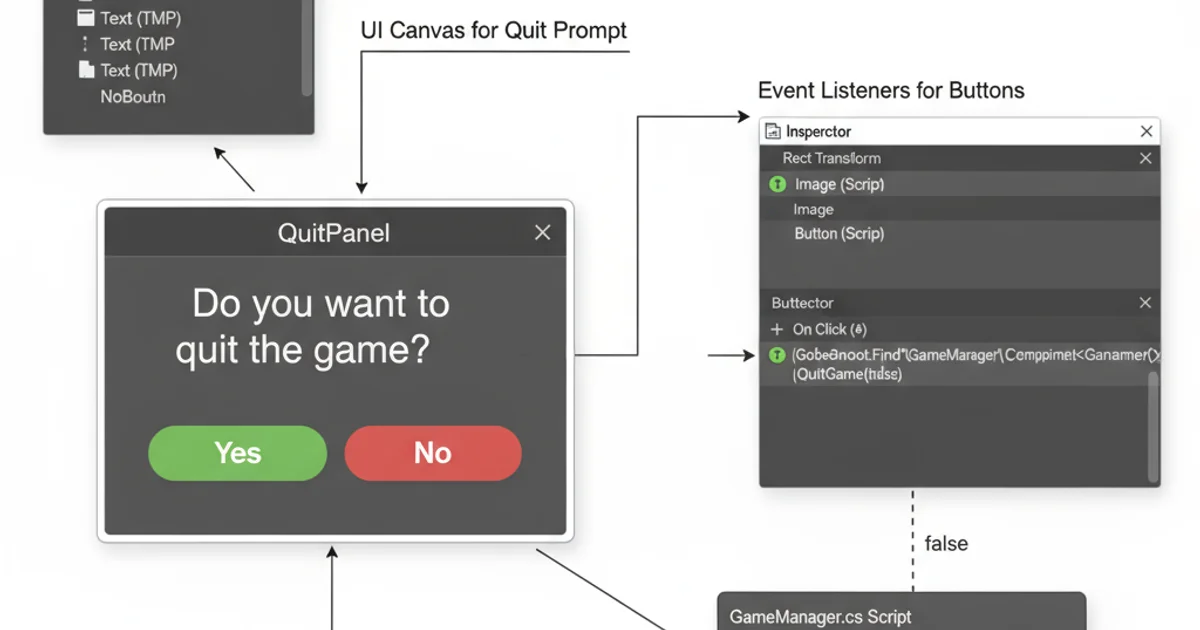
Example UI setup for the quit prompt in Unity.
QuitPanel GameObject to inactive in the Inspector initially. The script will activate it when needed.Testing on Android
After setting up the script and UI, build your Unity project for Android and deploy it to a device or emulator. When you run the game and press the device's back button, you should now see your custom quit confirmation panel appear. Pressing 'Yes' will close the application, while 'No' will hide the panel and return you to the game.