How to implement a button with a backend action in OpenWRT LUCI without UCI side effects
Categories:
Implementing Backend Actions with Buttons in OpenWRT LuCI
Learn how to create a custom button in OpenWRT LuCI that triggers a backend action without relying on UCI configuration changes, ensuring clean and side-effect-free operations.
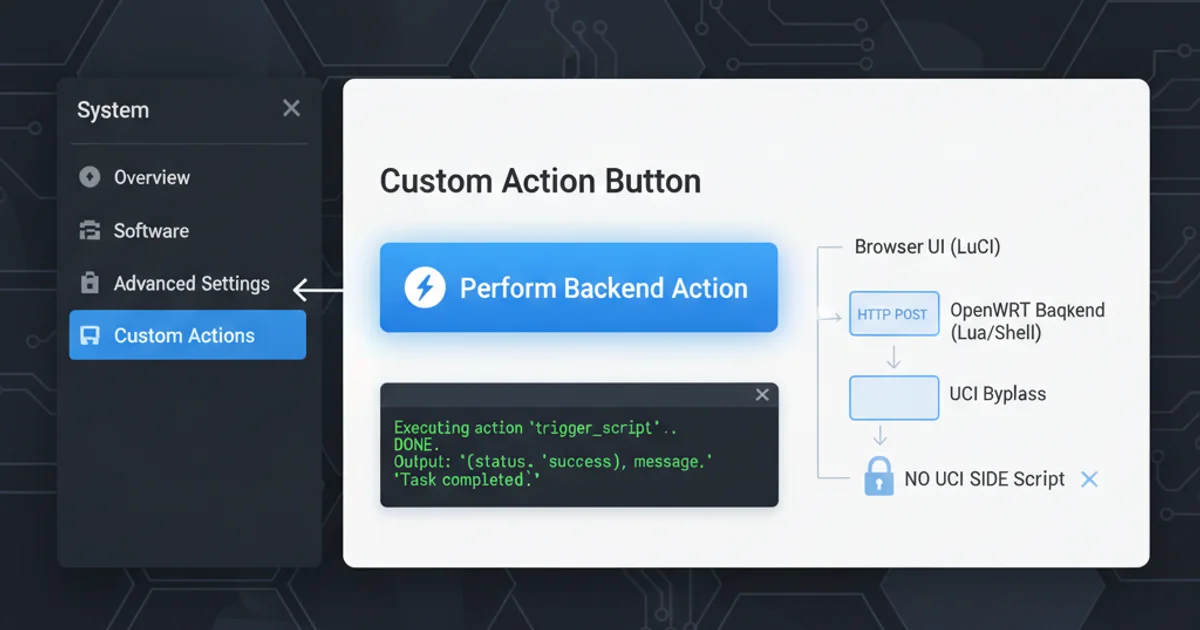
OpenWRT's LuCI (LuCI Configuration Interface) provides a powerful web-based interface for managing your router. While many actions involve modifying UCI (Unified Configuration Interface) settings, there are scenarios where you need a button to trigger a one-off script or a specific backend function without altering the persistent configuration. This article guides you through creating such a button, focusing on a clean implementation that avoids unintended UCI side effects.
Understanding LuCI's MVC Architecture
LuCI follows a Model-View-Controller (MVC) pattern. When you interact with the web interface, a request is sent to a controller, which then interacts with models (often backed by UCI) to retrieve or modify data. The view then renders the output. For our custom button, we'll primarily focus on the controller and a custom model that doesn't directly map to UCI.
flowchart TD
    A[User Clicks Button] --> B{HTTP Request to LuCI Controller}
    B --> C[Controller Action Invoked]
    C --> D[Custom Model/Function Called]
    D --> E[Backend Script/Command Executed]
    E --> F[Result/Status Returned]
    F --> C
    C --> G[View Renders Response]
    G --> A
Flow of a custom button action in LuCI
Creating the LuCI Controller and View
First, we need to define a new controller file and a corresponding view template. The controller will handle the HTTP request from the button click, and the view will display the button and any feedback. We'll create a simple controller that defines an action and a view that renders a form with a submit button.
-- /usr/lib/lua/luci/controller/mybutton.lua
module("luci.controller.mybutton", package.seeall)

function index()
    entry({"admin", "system", "mybutton"}, call("action_mybutton"), _("My Custom Button"), 90).leaf = true
end

function action_mybutton()
    if luci.http.getenv("REQUEST_METHOD") == "POST" then
        -- Call our backend function here
        local result = luci.sys.exec("/usr/bin/my_backend_script.sh")
        luci.template.render("mybutton/result", { result = result })
    else
        luci.template.render("mybutton/index")
    end
end
LuCI Controller: /usr/lib/lua/luci/controller/mybutton.lua
<%
    local sys = require "luci.sys"
    local result = nix.result
%>

<fieldset class="cbi-section">
    <legend>My Custom Action</legend>
    <p>Click the button below to trigger a backend script.</p>
    <form method="post" action="<%=luci.dispatcher.build_url("admin", "system", "mybutton")%>">
        <input type="submit" value="Run Backend Action" class="cbi-button cbi-button-action" />
    </form>
    <% if result then %>
        <pre><%=result%></pre>
    <% end %>
</fieldset>
LuCI View: /usr/lib/lua/luci/view/mybutton/index.htm
<%
    local result = nix.result
%>

<fieldset class="cbi-section">
    <legend>Action Result</legend>
    <p>The backend script returned:</p>
    <pre><%=result%></pre>
    <a href="<%=luci.dispatcher.build_url("admin", "system", "mybutton")%>" class="cbi-button">Back</a>
</fieldset>
LuCI View: /usr/lib/lua/luci/view/mybutton/result.htm
Implementing the Backend Script
The backend action itself will be a simple shell script. This script can perform any operation you need, such as restarting a service, clearing logs, or fetching dynamic data. The key is that it should not directly modify UCI configuration unless explicitly designed to do so, thus avoiding unintended side effects.
#!/bin/sh

echo "Backend action executed at $(date)"

# Example: Restart a service (use with caution)
# /etc/init.d/network restart

# Example: Read a system file
# cat /proc/cpuinfo

# You can return any output, which will be displayed in the LuCI interface

exit 0
Backend Script: /usr/bin/my_backend_script.sh
/usr/bin/my_backend_script.sh) is executable (chmod +x /usr/bin/my_backend_script.sh). Also, be extremely cautious with commands executed via luci.sys.exec, as they run with root privileges. Validate inputs and sanitize any user-provided data if your script were to accept parameters.Deployment and Testing
After creating these files, you'll need to place them in the correct locations on your OpenWRT device and then refresh LuCI's dispatcher cache. This will make your new button visible in the web interface.
1. Create Controller File
Save the Lua code for the controller as /usr/lib/lua/luci/controller/mybutton.lua on your OpenWRT device.
2. Create View Directory and Files
Create a new directory /usr/lib/lua/luci/view/mybutton/ and save the index.htm and result.htm files inside it.
3. Create Backend Script
Save the shell script as /usr/bin/my_backend_script.sh and make it executable using chmod +x /usr/bin/my_backend_script.sh.
4. Refresh LuCI Cache
Execute /etc/init.d/rpcd restart or lua /usr/lib/lua/luci/dispatcher.lua in your SSH terminal to refresh LuCI's dispatcher cache.
5. Access the Button
Navigate to System -> My Custom Button in your LuCI web interface. You should see your new button. Click it to test the backend action.