Using two CSS classes on one element
Categories:
Mastering CSS: Applying Multiple Classes to a Single Element

Learn how to effectively use multiple CSS classes on a single HTML element to create modular, reusable, and maintainable styles.
In web development, CSS classes are fundamental for styling HTML elements. A common and powerful technique is to apply multiple CSS classes to a single HTML element. This approach promotes modularity, reusability, and easier maintenance of your stylesheets. Instead of writing monolithic class definitions, you can combine smaller, focused classes to achieve complex styles. This article will guide you through the syntax, benefits, and best practices of using multiple classes.
The Basics: How to Apply Multiple Classes
Applying multiple classes to an HTML element is straightforward. You simply list the class names within the class attribute, separated by spaces. The order of the classes in the HTML attribute generally does not matter for how they are applied, but the order and specificity of your CSS rules will determine the final computed style.
<button class="btn primary large">Click Me</button>
<div class="card shadow rounded">Content Here</div>
Example of an HTML element with multiple classes.
.btn {
  padding: 10px 15px;
  border: none;
  cursor: pointer;
}

.primary {
  background-color: #007bff;
  color: white;
}

.large {
  font-size: 1.2em;
  padding: 15px 25px;
}

.card {
  border: 1px solid #ccc;
  padding: 20px;
}

.shadow {
  box-shadow: 0 4px 8px rgba(0,0,0,0.1);
}

.rounded {
  border-radius: 8px;
}
Corresponding CSS rules for the multiple classes.
Benefits of Using Multiple Classes
The ability to combine classes offers several significant advantages in CSS development:
flowchart TD
    A[Modular Styling] --> B{Reusable Components}
    B --> C[Reduced Redundancy]
    C --> D[Easier Maintenance]
    D --> E[Improved Readability]
    E --> F[Flexible Design]
    F --> A
Benefits of using multiple CSS classes.
- Modularity: Each class can be responsible for a single, distinct style concern (e.g.,
color,font-size,padding). This makes your CSS easier to understand and manage. - Reusability: Small, single-purpose classes can be combined in countless ways to style different elements without duplicating code. For instance, a
.text-centerclass can be applied to any element needing centered text. - Reduced Redundancy: Instead of creating a new class like
.primary-large-buttonfor every variation, you combine.primaryand.largewith.btn. - Easier Maintenance: Changes to a single-purpose class only affect that specific style property, reducing the risk of unintended side effects across your entire stylesheet.
- Improved Readability: Looking at an HTML element's
classattribute, you can quickly infer its visual characteristics by reading the class names. - Flexible Design: It allows for highly flexible and dynamic styling, especially when combined with JavaScript to add or remove classes based on user interaction or application state.
Common Use Cases and Best Practices
Multiple classes are particularly useful in component-based architectures and utility-first CSS frameworks. Here are some common scenarios and best practices:
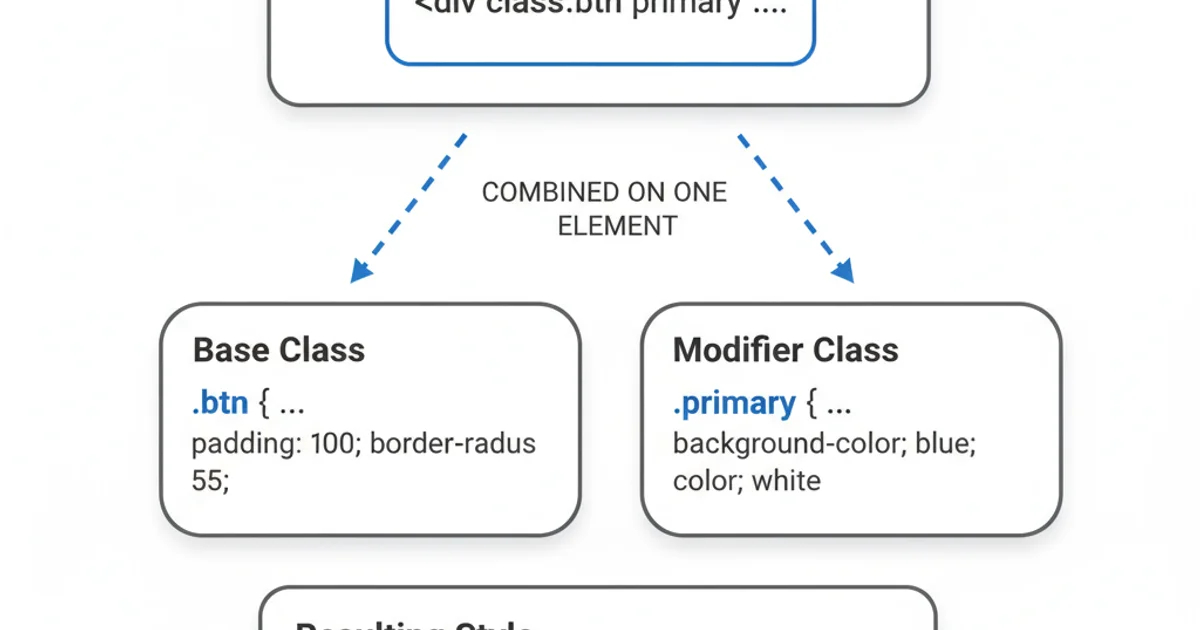
Combining base classes with modifier classes for variations.
Base Component + Modifiers
This is a very common pattern. You define a base class for a component (e.g., .button, .card) and then add modifier classes to change its appearance or behavior (e.g., .button--primary, .button--disabled, .card--dark).
Utility Classes
Utility classes are single-purpose classes that apply one specific style, such as .margin-top-20, .text-bold, or .display-flex. These are highly reusable and can be sprinkled throughout your HTML.
State Classes
Classes that indicate the current state of an element, often toggled by JavaScript. Examples include .is-active, .is-hidden, .has-error.
Best Practices:
- Keep classes focused: Each class should ideally do one thing well.
- Avoid over-nesting: While specificity matters, try to keep your CSS selectors as flat as possible to prevent specificity wars.
- Use BEM (Block Element Modifier) or similar naming conventions: This helps organize your classes and makes their purpose clear, especially when dealing with components and their variations.
- Document your utility classes: If you create many utility classes, maintain a style guide or documentation for easy reference.