Redirecting EMails with Amazon SES Service
Categories:
Redirecting Emails with Amazon SES and Route 53
Learn how to set up email redirection for your custom domain using Amazon Simple Email Service (SES) and Amazon Route 53, enabling you to receive emails at custom addresses without a dedicated mail server.
Amazon Simple Email Service (SES) is a cost-effective, flexible, and scalable email service that enables developers to send mail from within any application. While primarily known for sending emails, SES can also be configured to receive incoming emails. This capability, combined with Amazon Route 53 for DNS management, allows you to set up email redirection for your domain without needing to provision and maintain a full-fledged email server. This article will guide you through the process of configuring SES to receive emails and forward them to an existing email address, such as a Gmail or Outlook account.
Understanding the Email Redirection Flow
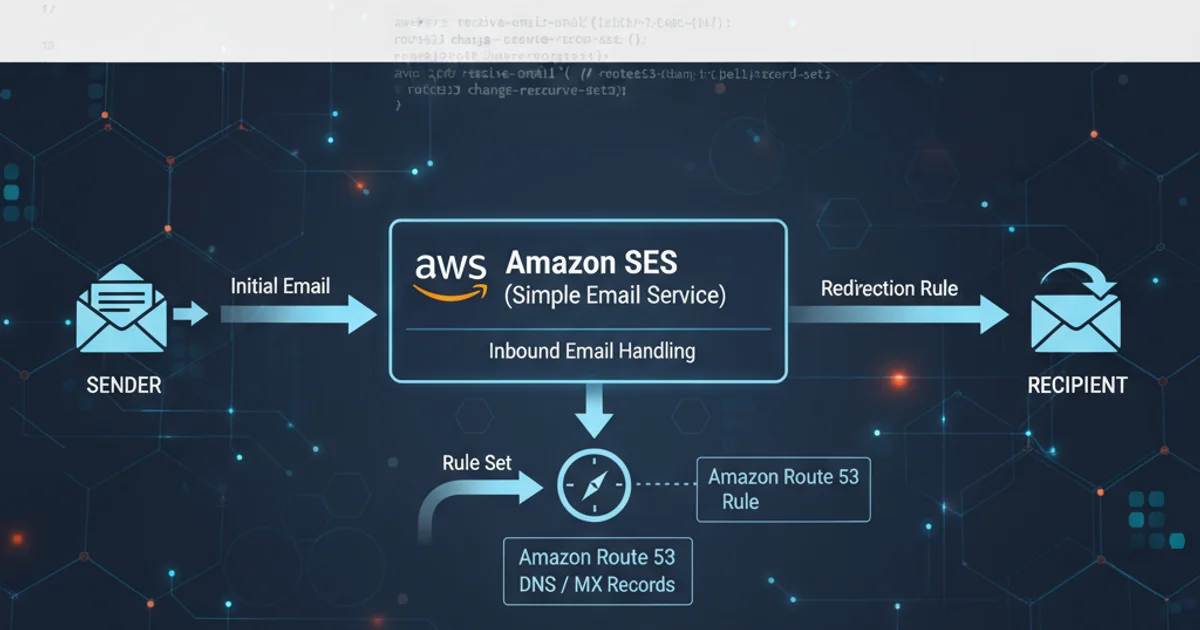
Before diving into the configuration, it's crucial to understand how email redirection works with SES and Route 53. When an email is sent to your custom domain, Route 53's MX records direct the email to SES. SES then receives the email, processes it based on predefined rules, and forwards it to your designated recipient email address. This process involves setting up a 'receipt rule set' in SES that specifies what actions to take when an email arrives for your domain.
sequenceDiagram
    participant Sender
    participant DNS (Route 53)
    participant SES (Email Receiving)
    participant S3 (Optional)
    participant SNS (Optional)
    participant Lambda (Optional)
    participant Recipient (e.g., Gmail)

    Sender->>DNS (Route 53): Looks up MX record for example.com
    DNS (Route 53)-->>Sender: Returns SES endpoint
    Sender->>SES (Email Receiving): Sends email to user@example.com
    SES (Email Receiving)->>SES (Email Receiving): Applies Receipt Rule Set
    alt Rule: Store in S3
        SES (Email Receiving)->>S3 (Optional): Stores email content
    end
    alt Rule: Publish to SNS
        SES (Email Receiving)->>SNS (Optional): Publishes email metadata
    end
    alt Rule: Invoke Lambda
        SES (Email Receiving)->>Lambda (Optional): Triggers custom processing
    end
    SES (Email Receiving)->>Recipient (e.g., Gmail): Forwards email (via S3/SNS/Lambda or direct action)
    Recipient (e.g., Gmail)-->>SES (Email Receiving): Acknowledges receipt
Email Redirection Flow with Amazon SES
Prerequisites
Before you begin, ensure you have the following in place:
- An AWS Account: You need an active AWS account with appropriate permissions to configure SES and Route 53.
- A Registered Domain: Your domain must be registered and managed by Amazon Route 53, or you must be able to update its MX records to point to SES.
- Verified Email Address/Domain in SES: The domain you want to receive emails for, and the email address you want to forward emails to, must be verified in Amazon SES. This is a crucial step to prevent abuse and ensure deliverability.
Step-by-Step Configuration
Follow these steps to set up email redirection using Amazon SES and Route 53.
1. 1. Verify Your Domain and Email Address in SES
Navigate to the Amazon SES console. Under 'Verified identities', click 'Create identity'. Choose 'Domain' and enter your domain name. Follow the instructions to verify ownership, typically by adding CNAME records to your Route 53 hosted zone. Also, verify the email address you intend to forward emails to (e.g., your personal Gmail) by adding it as an 'Email address' identity and clicking the verification link sent to that address.
2. 2. Create an S3 Bucket for Email Storage (Optional but Recommended)
Even if you're just redirecting, SES requires an S3 bucket to temporarily store incoming emails. Go to the S3 console and create a new bucket. Ensure the bucket name is unique and choose a region that matches your SES configuration. You can configure lifecycle rules to automatically delete old emails from this bucket if you don't need long-term storage.
3. 3. Configure MX Records in Route 53
In the Route 53 console, navigate to your domain's hosted zone. Create a new record set (or modify an existing one) with the following details:
- Record type: MX - Mail exchange
- Value: Enter the SES MX endpoints for your AWS region. For example, for
us-east-1, it might be10 inbound-smtp.us-east-1.amazonaws.com. You can find the exact values in the SES console under 'Email Receiving' -> 'Configuration Sets' -> 'MX Records'. - TTL: Keep the default or set a lower value for faster propagation.
4. 4. Create a Receipt Rule Set in SES
In the SES console, go to 'Email Receiving' -> 'Receipt rule sets'. Click 'Create receipt rule'.
- Rule Name: Give it a descriptive name (e.g.,
MyDomainEmailRedirect). - Recipients: Add the email address(es) you want to redirect (e.g.,
info@yourdomain.com,support@yourdomain.com). You can also useyourdomain.comto catch all emails for the domain. - Actions: Add an action of type 'S3' and select the S3 bucket you created earlier. This is mandatory. Then, add another action of type 'Bounce' or 'SNS' or 'Lambda' if you need more advanced processing. For simple redirection, you might use a Lambda function to parse the email and send it to another address using SES SendEmail API.
5. 5. Create a Lambda Function for Redirection (Advanced)
For direct email forwarding, you'll need a Lambda function. This function will be triggered by SES when an email arrives. It will read the email from S3, parse it, and then use SES to send it to your target email address. Here's a basic Python example:
import boto3
import email
from email.mime.multipart import MIMEMultipart
from email.mime.text import MIMEText
from email.mime.application import MIMEApplication

s3 = boto3.client('s3')
ses = boto3.client('ses')

TARGET_EMAIL = 'your_personal_email@example.com'
SOURCE_EMAIL = 'noreply@yourdomain.com' # Must be SES verified

def lambda_handler(event, context):
    for record in event['Records']:
        bucket_name = record['s3']['bucket']['name']
        object_key = record['s3']['object']['key']

        response = s3.get_object(Bucket=bucket_name, Key=object_key)
        raw_email = response['Body'].read().decode('utf-8')

        msg = email.message_from_string(raw_email)

        # Create a new email for forwarding
        forward_msg = MIMEMultipart()
        forward_msg['Subject'] = f"Fwd: {msg['Subject']}"
        forward_msg['From'] = SOURCE_EMAIL
        forward_msg['To'] = TARGET_EMAIL

        # Add original email content as a part
        if msg.is_multipart():
            for part in msg.walk():
                ctype = part.get_content_type()
                cdisp = str(part.get('Content-Disposition'))

                if ctype == 'text/plain' and 'attachment' not in cdisp:
                    forward_msg.attach(MIMEText(part.get_payload(decode=True), 'plain'))
                elif ctype == 'text/html' and 'attachment' not in cdisp:
                    forward_msg.attach(MIMEText(part.get_payload(decode=True), 'html'))
                elif 'attachment' in cdisp:
                    filename = part.get_filename()
                    if filename:
                        attachment = MIMEApplication(part.get_payload(decode=True))
                        attachment.add_header('Content-Disposition', 'attachment', filename=filename)
                        forward_msg.attach(attachment)
        else:
            forward_msg.attach(MIMEText(msg.get_payload(decode=True), msg.get_content_subtype()))

        try:
            ses.send_raw_email(
                Source=SOURCE_EMAIL,
                Destinations=[TARGET_EMAIL],
                RawMessage={'Data': forward_msg.as_string()}
            )
            print(f"Email forwarded from {msg['From']} to {TARGET_EMAIL}")
        except Exception as e:
            print(f"Error forwarding email: {e}")

    return {'statusCode': 200, 'body': 'Emails processed'}
Remember to grant the Lambda function permissions to read from S3 and send emails via SES. Also, ensure SOURCE_EMAIL is an SES-verified identity.
6. 6. Test Your Configuration
Send a test email to one of the addresses you configured (e.g., info@yourdomain.com). Check your target email inbox (e.g., your Gmail account) to confirm that the email was successfully forwarded. If you encounter issues, review your SES receipt rules, S3 bucket policies, Lambda logs, and Route 53 MX records.
s3:GetObject for the S3 bucket and ses:SendRawEmail for SES) to perform its tasks. Without these, the forwarding will fail silently or with errors in your Lambda logs.By following these steps, you can effectively set up email redirection for your domain using Amazon SES and Route 53, providing a robust and scalable solution for receiving emails without the overhead of managing a dedicated mail server. This setup is particularly useful for small businesses, personal domains, or applications that need to receive customer inquiries.