Configuring Maven 2 POM Editor to open pom.xml files in source mode
Categories:
Configuring Eclipse to Open Maven POM Files in Source Mode by Default
Learn how to permanently set the Maven 2 POM Editor in Eclipse to open pom.xml files directly in source mode, bypassing the graphical editor for a more efficient workflow.
When working with Maven projects in Eclipse, the default behavior for opening pom.xml files is often the graphical Maven POM Editor. While this editor can be useful for some tasks, many developers prefer to work directly with the XML source code for greater control, faster editing, and better integration with XML-aware features like auto-completion and validation. This article provides a straightforward guide to configure your Eclipse environment to always open pom.xml files in source mode.
Understanding the Default Behavior
By default, Eclipse, especially with the m2e (Maven Integration for Eclipse) plugin, associates pom.xml files with its built-in Maven POM Editor. This editor presents a multi-tabbed interface, typically starting with an 'Overview' tab, followed by 'Dependencies', 'Plugins', 'Reporting', 'Profiles', 'Build', 'Source', and 'Dependency Hierarchy'. While the 'Source' tab is always available, navigating to it every time you open a pom.xml can become tedious and interrupt your development flow. The goal is to make the 'Source' tab the primary view.
flowchart TD
    A[Open pom.xml] --> B{Default Editor?}
    B -->|Yes| C[Graphical POM Editor]
    C --> D[Manually Switch to Source Tab]
    B -->|No| E[Source Editor]
    E --> F[Edit XML Directly]
    D --> F
Default vs. Desired Workflow for Opening pom.xml
Configuring File Associations in Eclipse Preferences
Eclipse provides a robust preference system that allows you to customize how different file types are handled. To change the default editor for pom.xml files, you need to modify the file associations. This involves telling Eclipse to prioritize the generic XML editor or a specific text editor over the Maven POM Editor for files matching the *.xml pattern, or more specifically, pom.xml.
1. Open Eclipse Preferences
Navigate to Window > Preferences (on Windows/Linux) or Eclipse > Preferences (on macOS).
2. Locate File Associations
In the Preferences dialog, expand General and then select Editors > File Associations.
3. Add or Select '*.xml' File Type
In the 'File types' section, look for *.xml. If it's not present, click 'Add...' and type *.xml then click 'OK'. Select *.xml from the list.
4. Configure Associated Editors
In the 'Associated editors' section, you will see a list of editors. Ensure that 'XML Editor' is present. If not, click 'Add...' and select 'XML Editor' from the list, then click 'OK'. You might also see 'Maven POM Editor' listed.
5. Set 'XML Editor' as Default
Select 'XML Editor' in the 'Associated editors' list and click the 'Default' button. This will move 'XML Editor' to the top of the list with '(Default)' next to it. If 'Maven POM Editor' is also present, ensure it is not the default.
6. Apply and Close
Click 'Apply' and then 'OK' to save your changes and close the Preferences dialog.
pom.xml files opening in the graphical editor after these steps, try restarting Eclipse. Sometimes, changes to file associations require a full IDE restart to take effect.Verifying the Configuration
After applying the changes, open any pom.xml file in your workspace. It should now open directly in the XML source editor, displaying the raw XML content. You can still access the graphical Maven POM Editor by right-clicking the pom.xml file, selecting Open With, and then choosing Maven POM Editor.
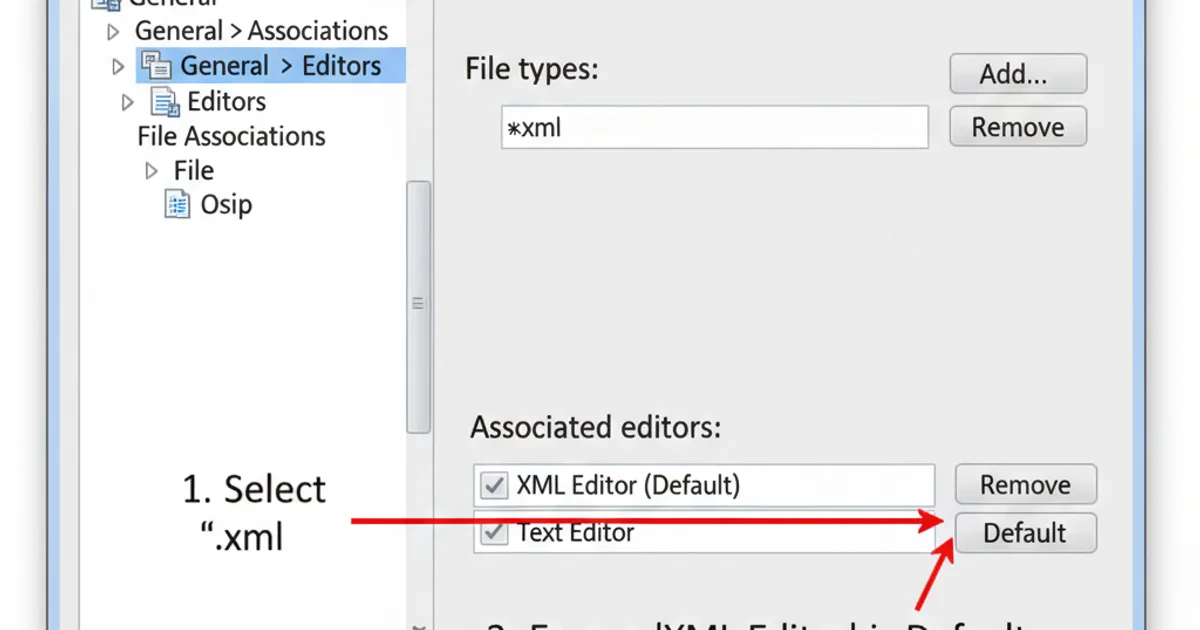
Eclipse Preferences: Setting XML Editor as default for *.xml files.
This configuration significantly streamlines the process for developers who prefer to manage their Maven project configurations directly through XML, providing a more consistent and efficient editing experience within Eclipse.